alexanderdejong.com

Wordpress Developer

  • Home
  • Blog
  • Projects
  • Contact
You are here: Home / Archives for atpdejong

Migrating a WordPress Website Manually with Phpmyadmin, Search and Replace, DigitalOcean and Runcloud

Posted on October 26, 2017 1 Comment

I’ve had plenty of WordPress sites on shared hosting (DreamHost) and it was wonderful as my experience with their custom service has always been terrific. Shared hosting was great to have during those early years as it’s relatively easy to manage, e-mail is included, and the costs are low.

However, the problem with shared hosting is that the servers aren’t generally optimized for WordPress performance and once you try to do anything that requires some memory. For example, a simple task like exporting a SQL database using a plugin or phpmyadmin can even become impossible.

Then I found Digital Ocean

As I wanted to try more complex things I started looking around for a new provider where I could consolidate all me websites into one platform. My goal was to move all my sites to one super fast provider with low costs. Now there are many VPS providers, like Vultr, Linode etc. I choose for Digital Ocean because it looks like a company that was “fast-moving”, cheap, developer-friendly and financially secure (big investments).

Get a Control Panel for your VPS

The big hurdle with cloud hosting for most people is that with Cloud hosting there are no control panels. However, back then I found Serverpilot and I used their services to manage my VPS at DigitalOcean. Two weeks ago, I migrated to Runcloud.io as they charge per account while Serverpilot charges per server. Paying per server was a costly option for me and my clients. I like to run my own apps and my clients on their own fast server. And Serverpilot’s monthly bill was costly, I felt a bit worried at first but Runcloud.io is running very smoothly and I love all the extra options I have. But that is a story for another blog post 🙂

To hopefully make it a bit easier, I’m sharing the steps I used to set up and migrate multiple sites to the same Droplet.

If you just need one site, it might be simpler to have DigitalOcean set up WordPress (under Applications) when you create the Droplet, and then skip to the migration steps.
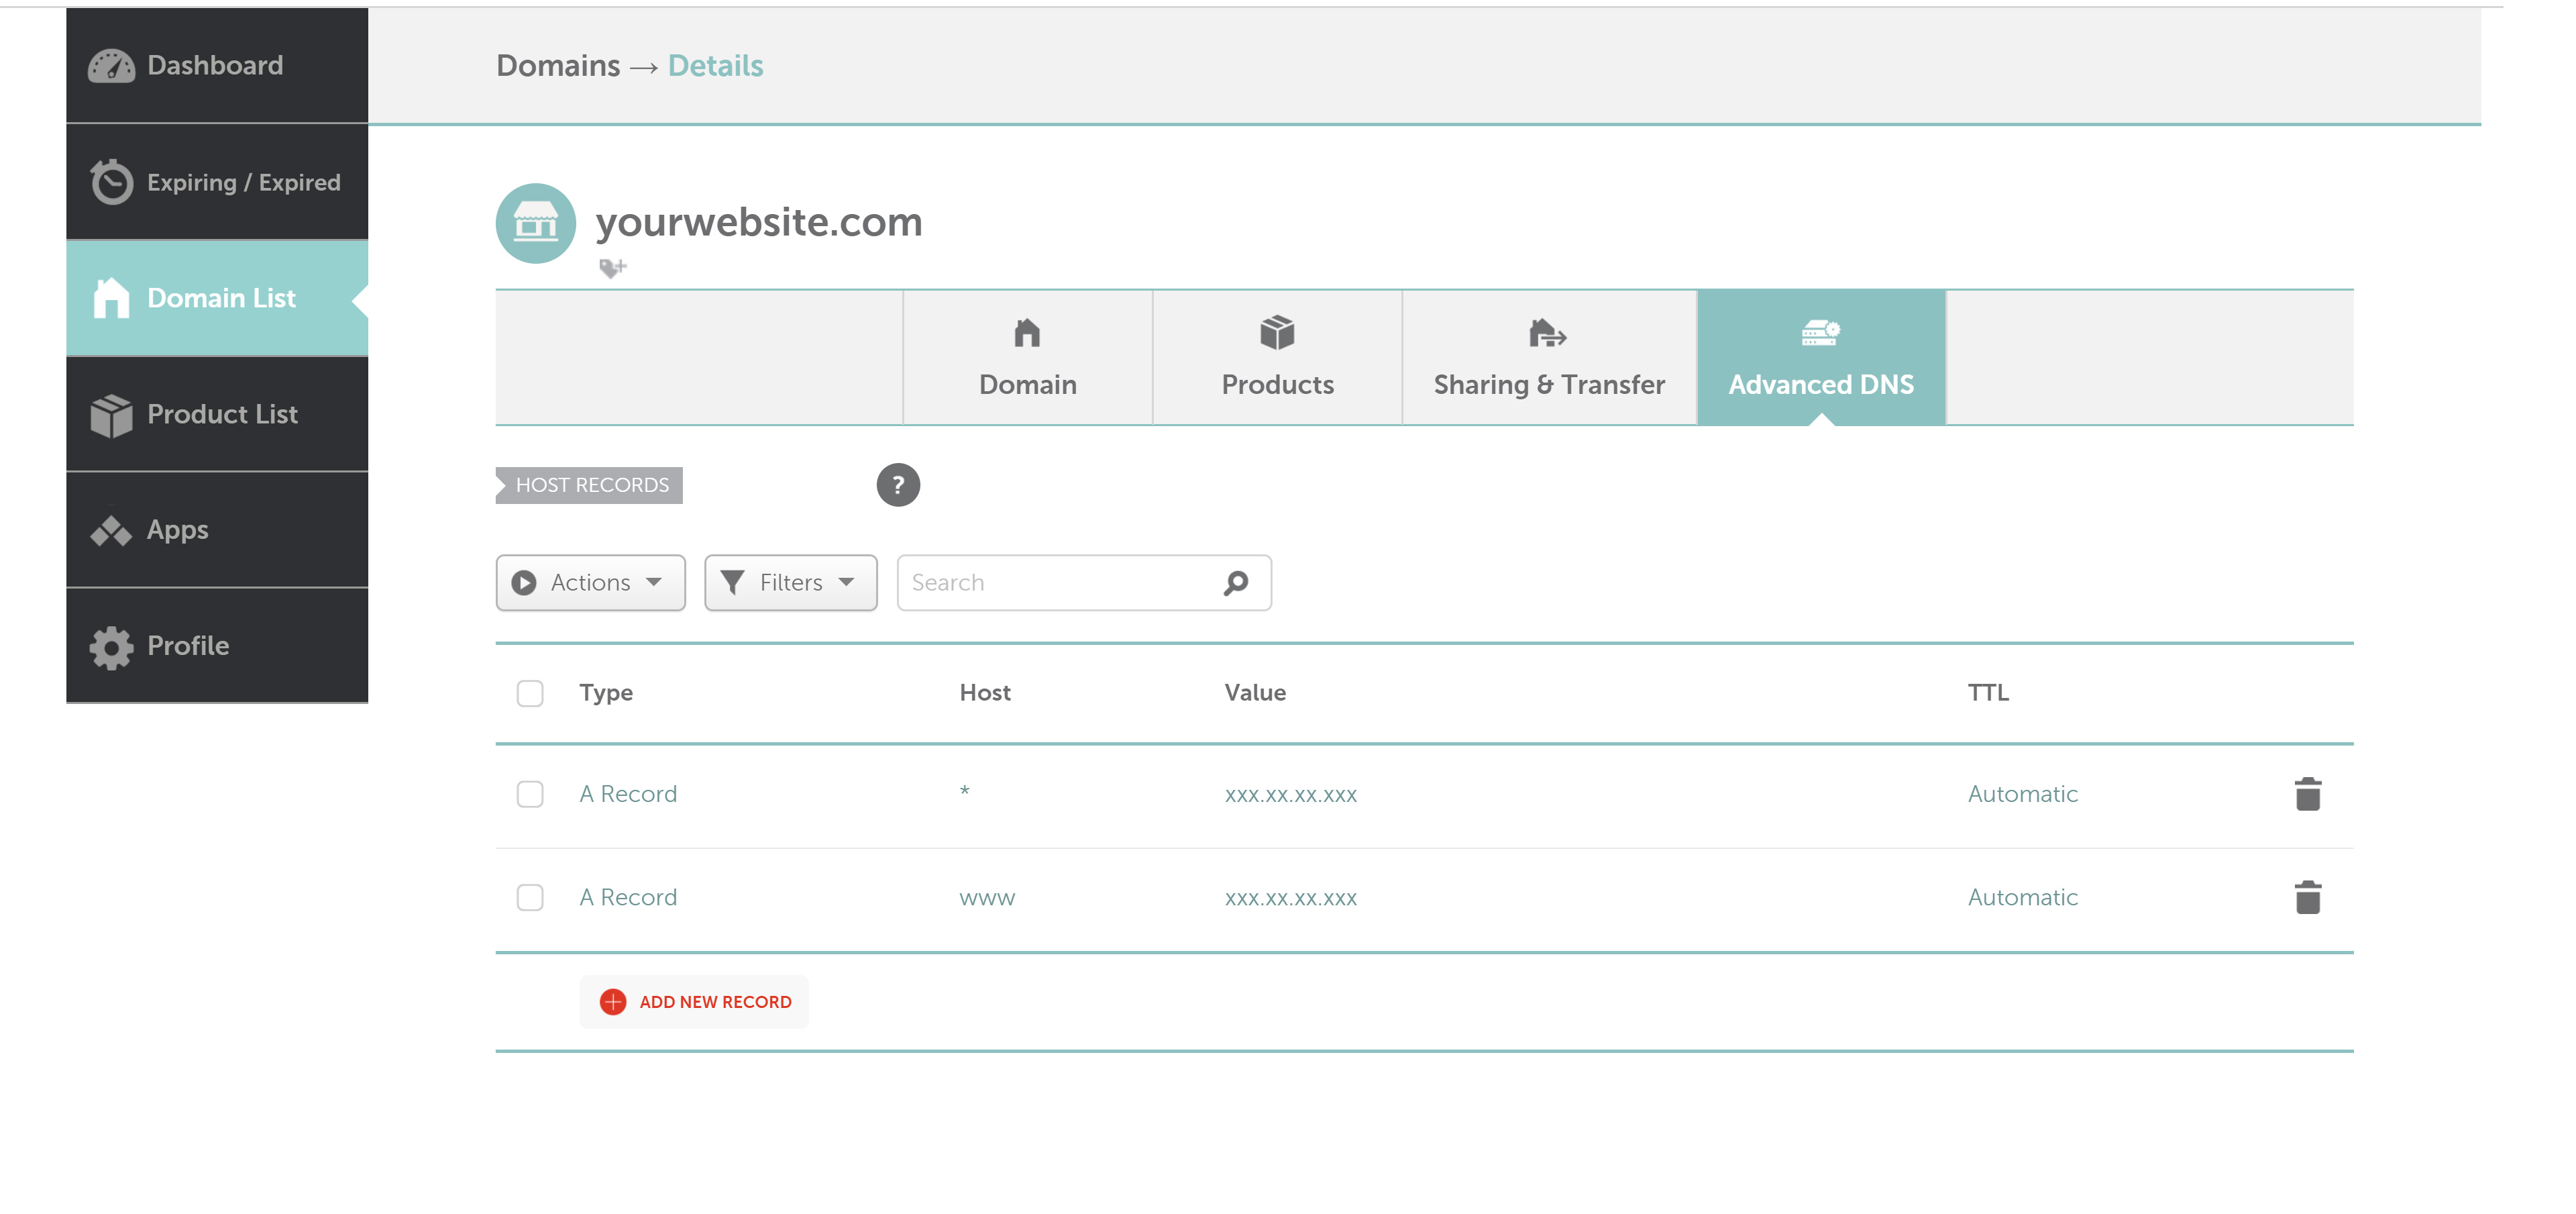
DNS Settings

Make sure you setup your DNS settings correctly by pointing your domain registration to the right IP address. You can do this with your domain registrar, which are sites like: godaddy.com, namecheap.com, 1and1.com etc.

My A record looks like this:
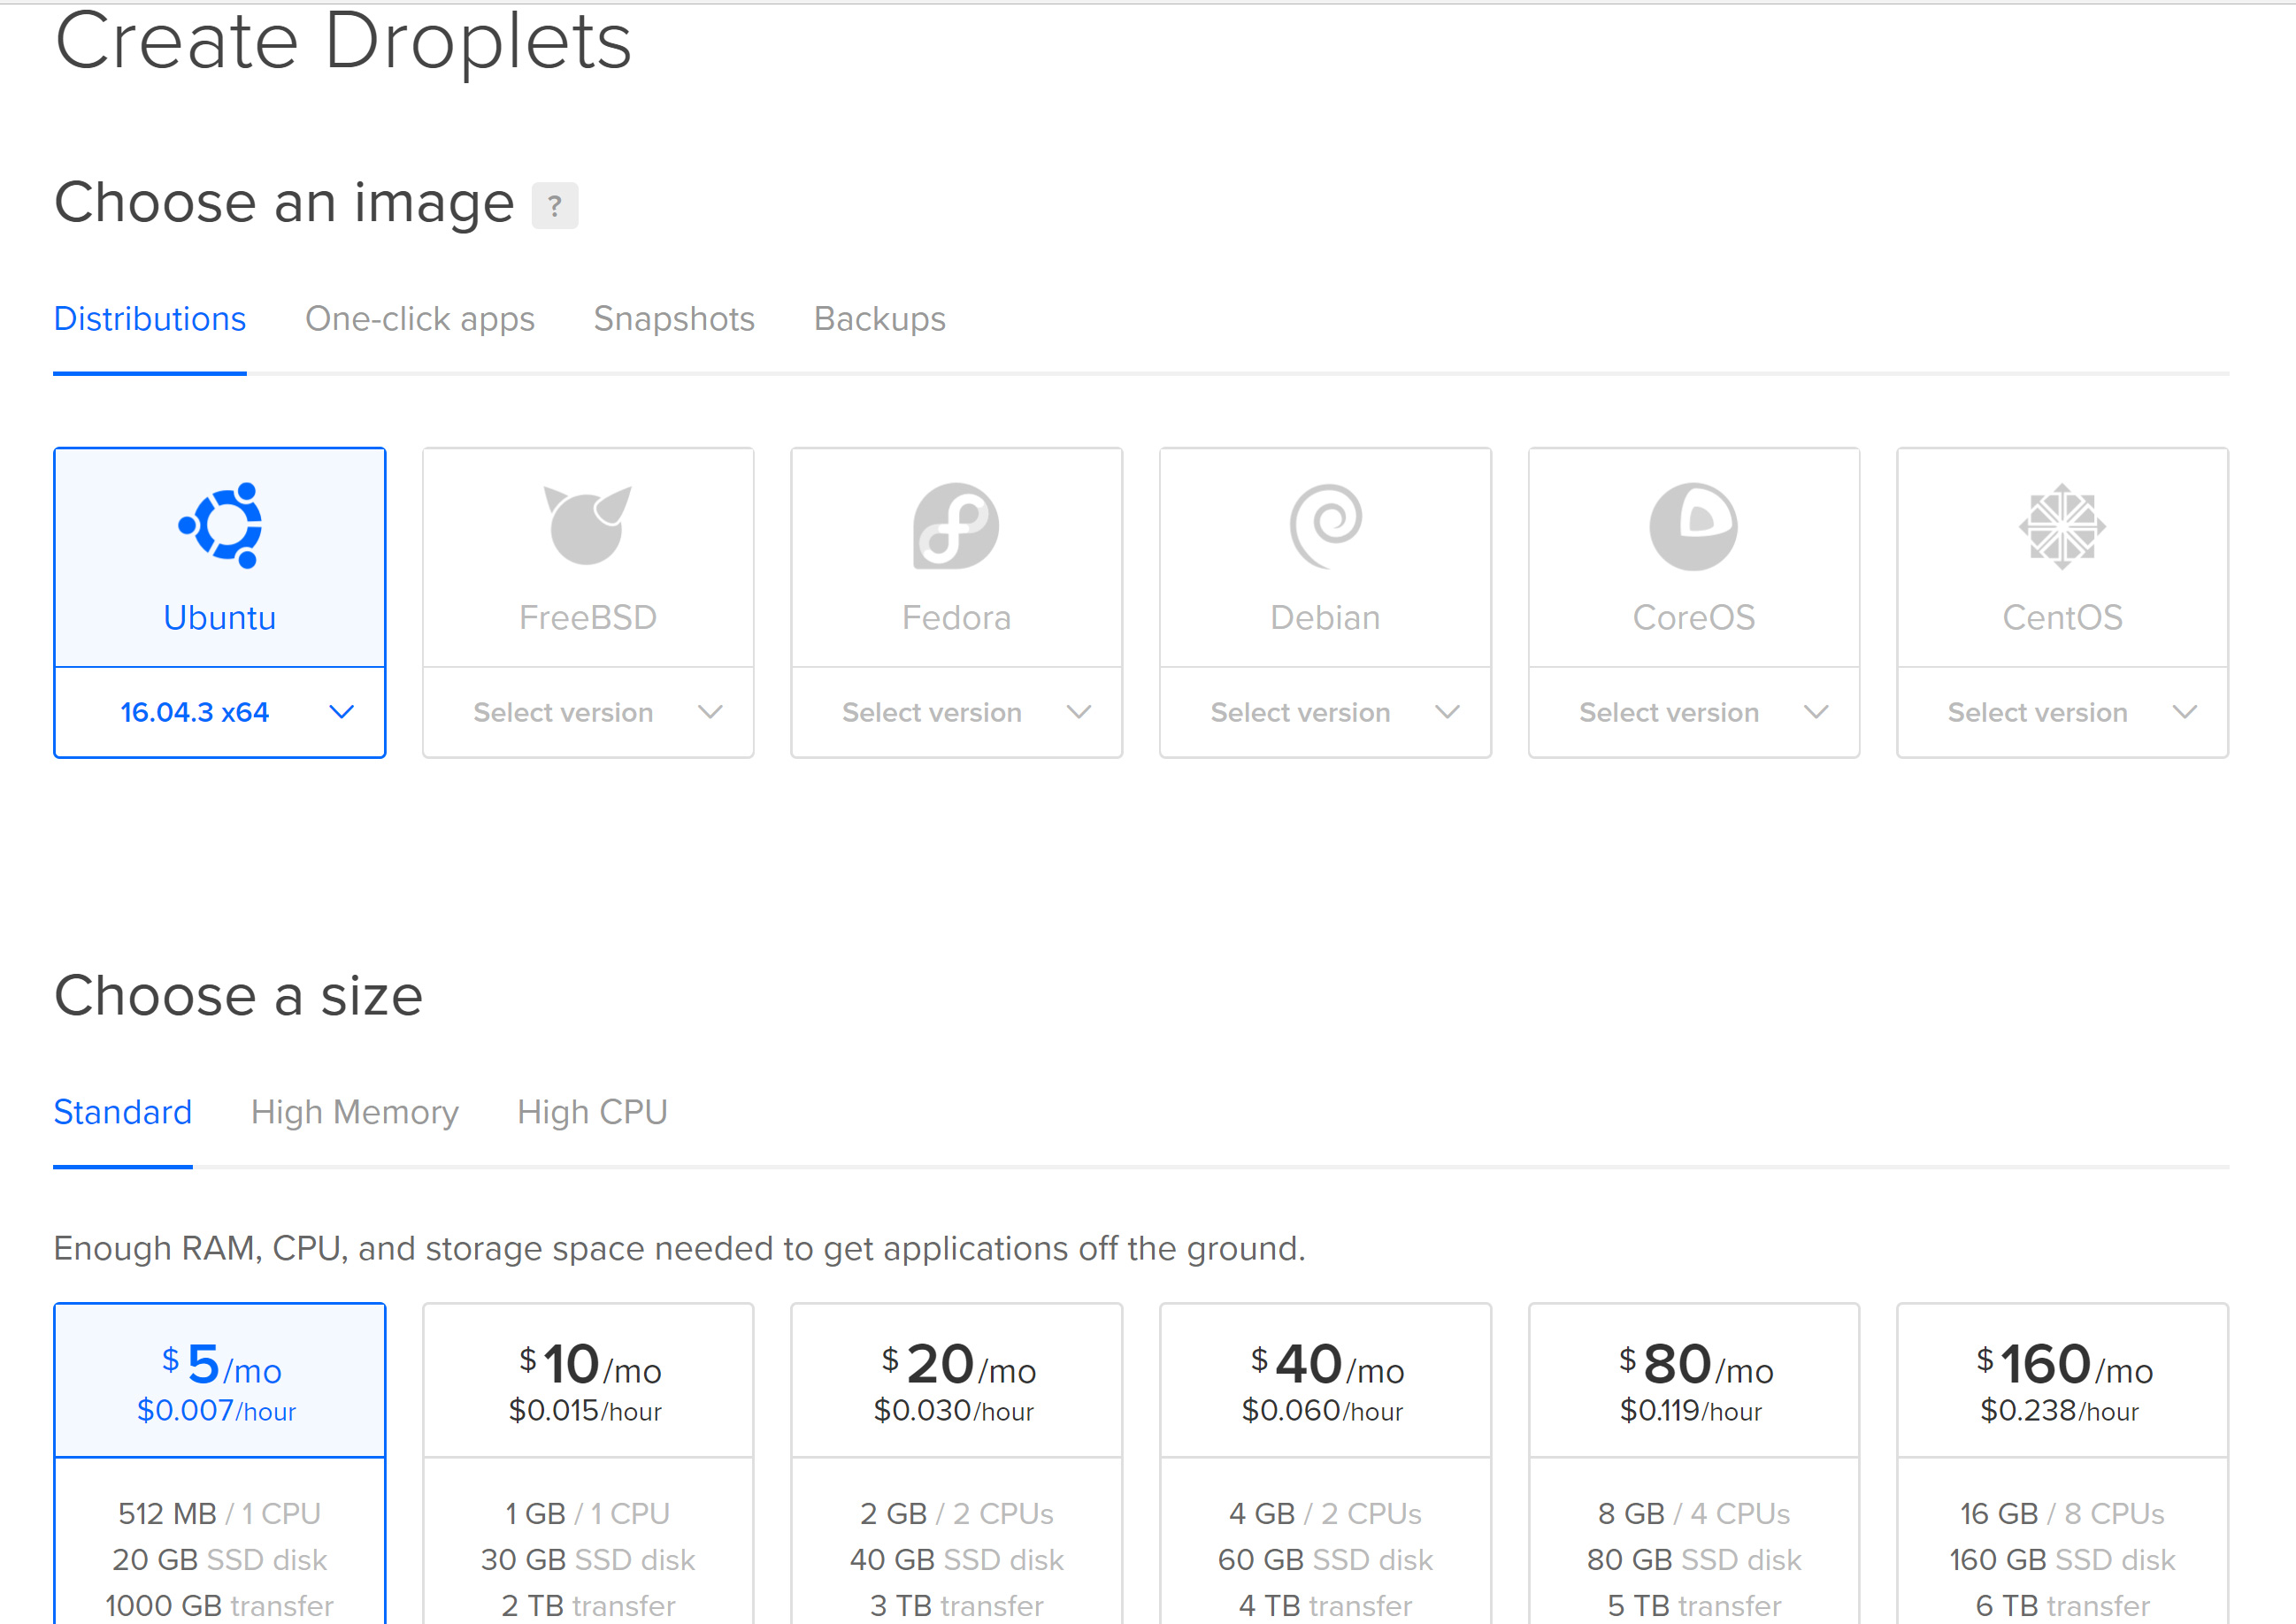
Droplet Creation

a) Create an account with DigitalOcean. Then head to the Create Droplets tab.

b) Click “SSH Keys” and add your public key. You can also get an FTP key as we won’t need SSH to manage our data. However, I do strongly recommend learning about SSH as it will make your workflow super fast!

Cheatsheet: To copy your public key, open terminal and enter:

pbcopy < ~/.ssh/id_rsa.pub
That should save it to the clipboard, which you can then paste in the field for DigitalOcean.

GitHub has a good instructions for generating an SSH key if you don’t have one.

c) Click “Create” to build a new Droplet.

Give the Droplet a name you’ll remember.
Choose a size (I went with the smallest to house my low traffic sites).
Choose location and server, I went with the defaults (New York, Ubuntu 14.04 x64 server).
Add your SSH key.
Click “Create Droplet”.

Your droplet will take few seconds to set up. When it finishes the IP address will be at the top of the dashboard. Go ahead and copy this. Throughout this tutorial I’ll refer to that IP address as xxx.xxx.xx.xxx.

Next step is to SSH into your new Droplet. You need to use the root user to do this. Open terminal:

ssh root@xxx.xxx.xx.xxx
(You shouldn’t need a password if your SSH key was added correctly)

To set up the WordPress site(s), I used, as mentioned above, Runcloud.io.

To install Runcloud server, create an account with them. Login to your server with SSH for one time and run this from your Droplet. After this step you don’t necessarily need to use SSH anymore:

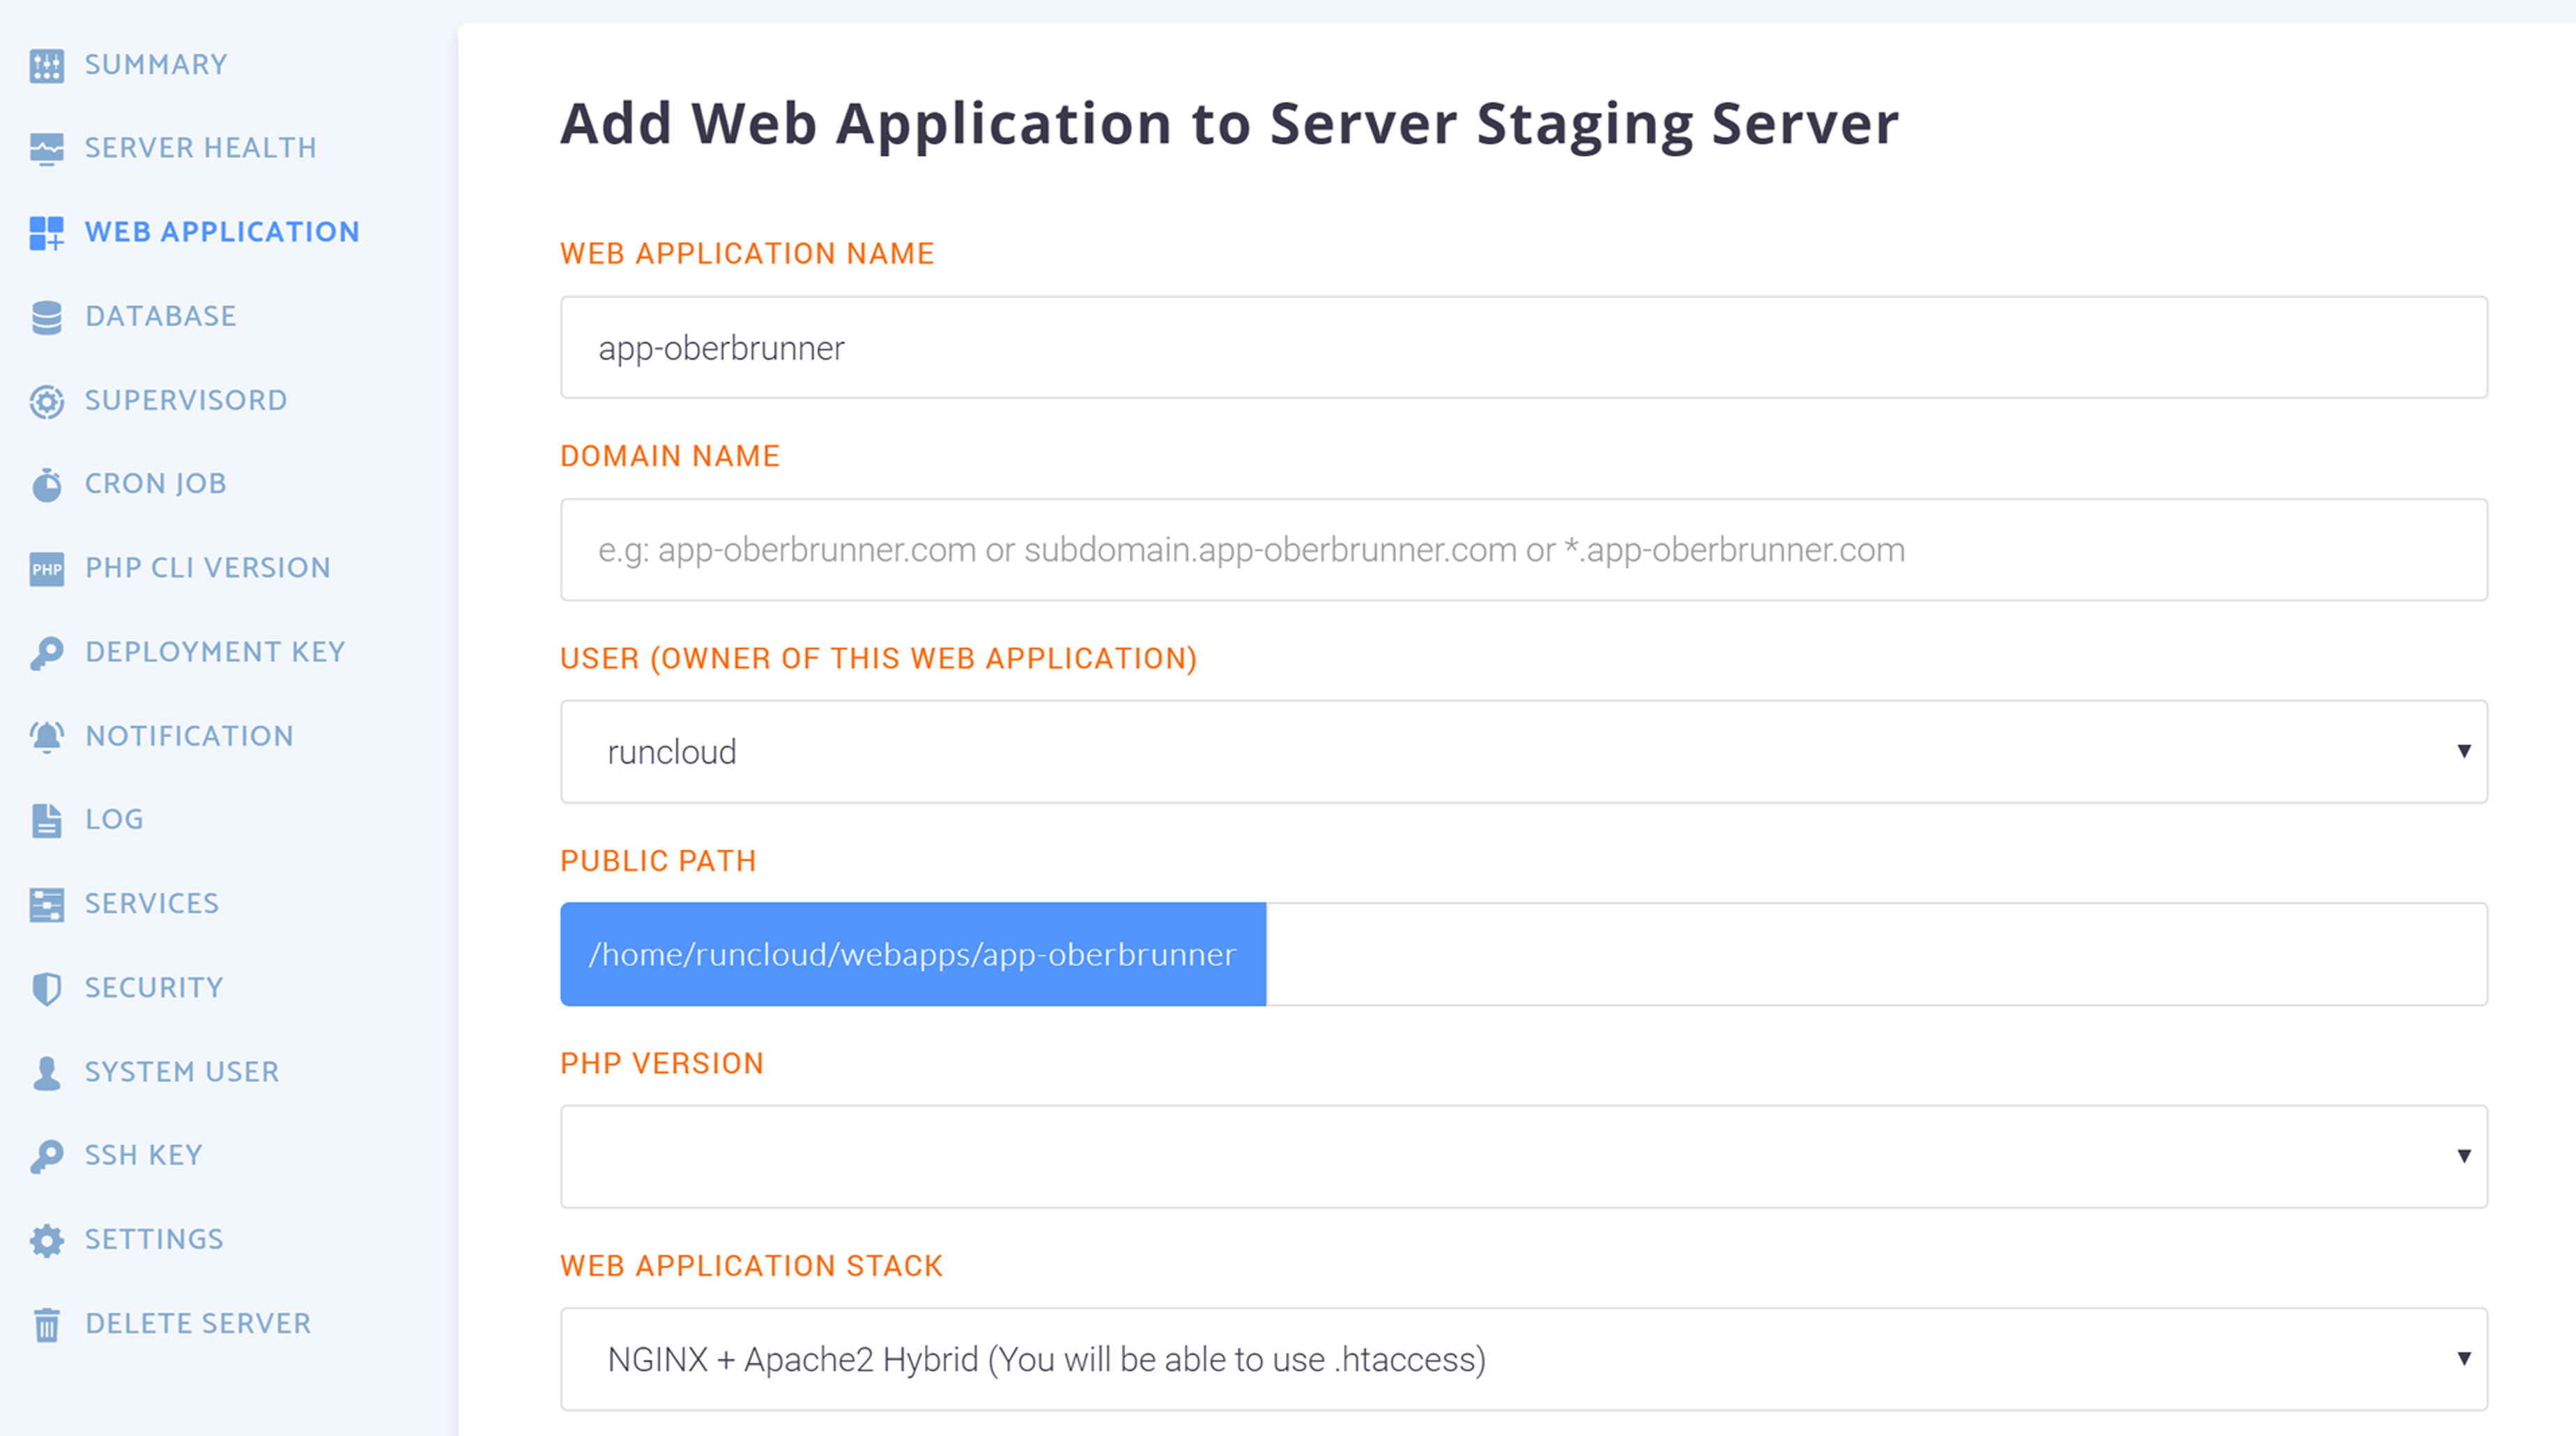
Once Runcloud is set up. Head in to the dashboard and create a web app.

After you have created your Web Application make sure you go to “system user” tab and change your “runcloud” user password to something you can use.

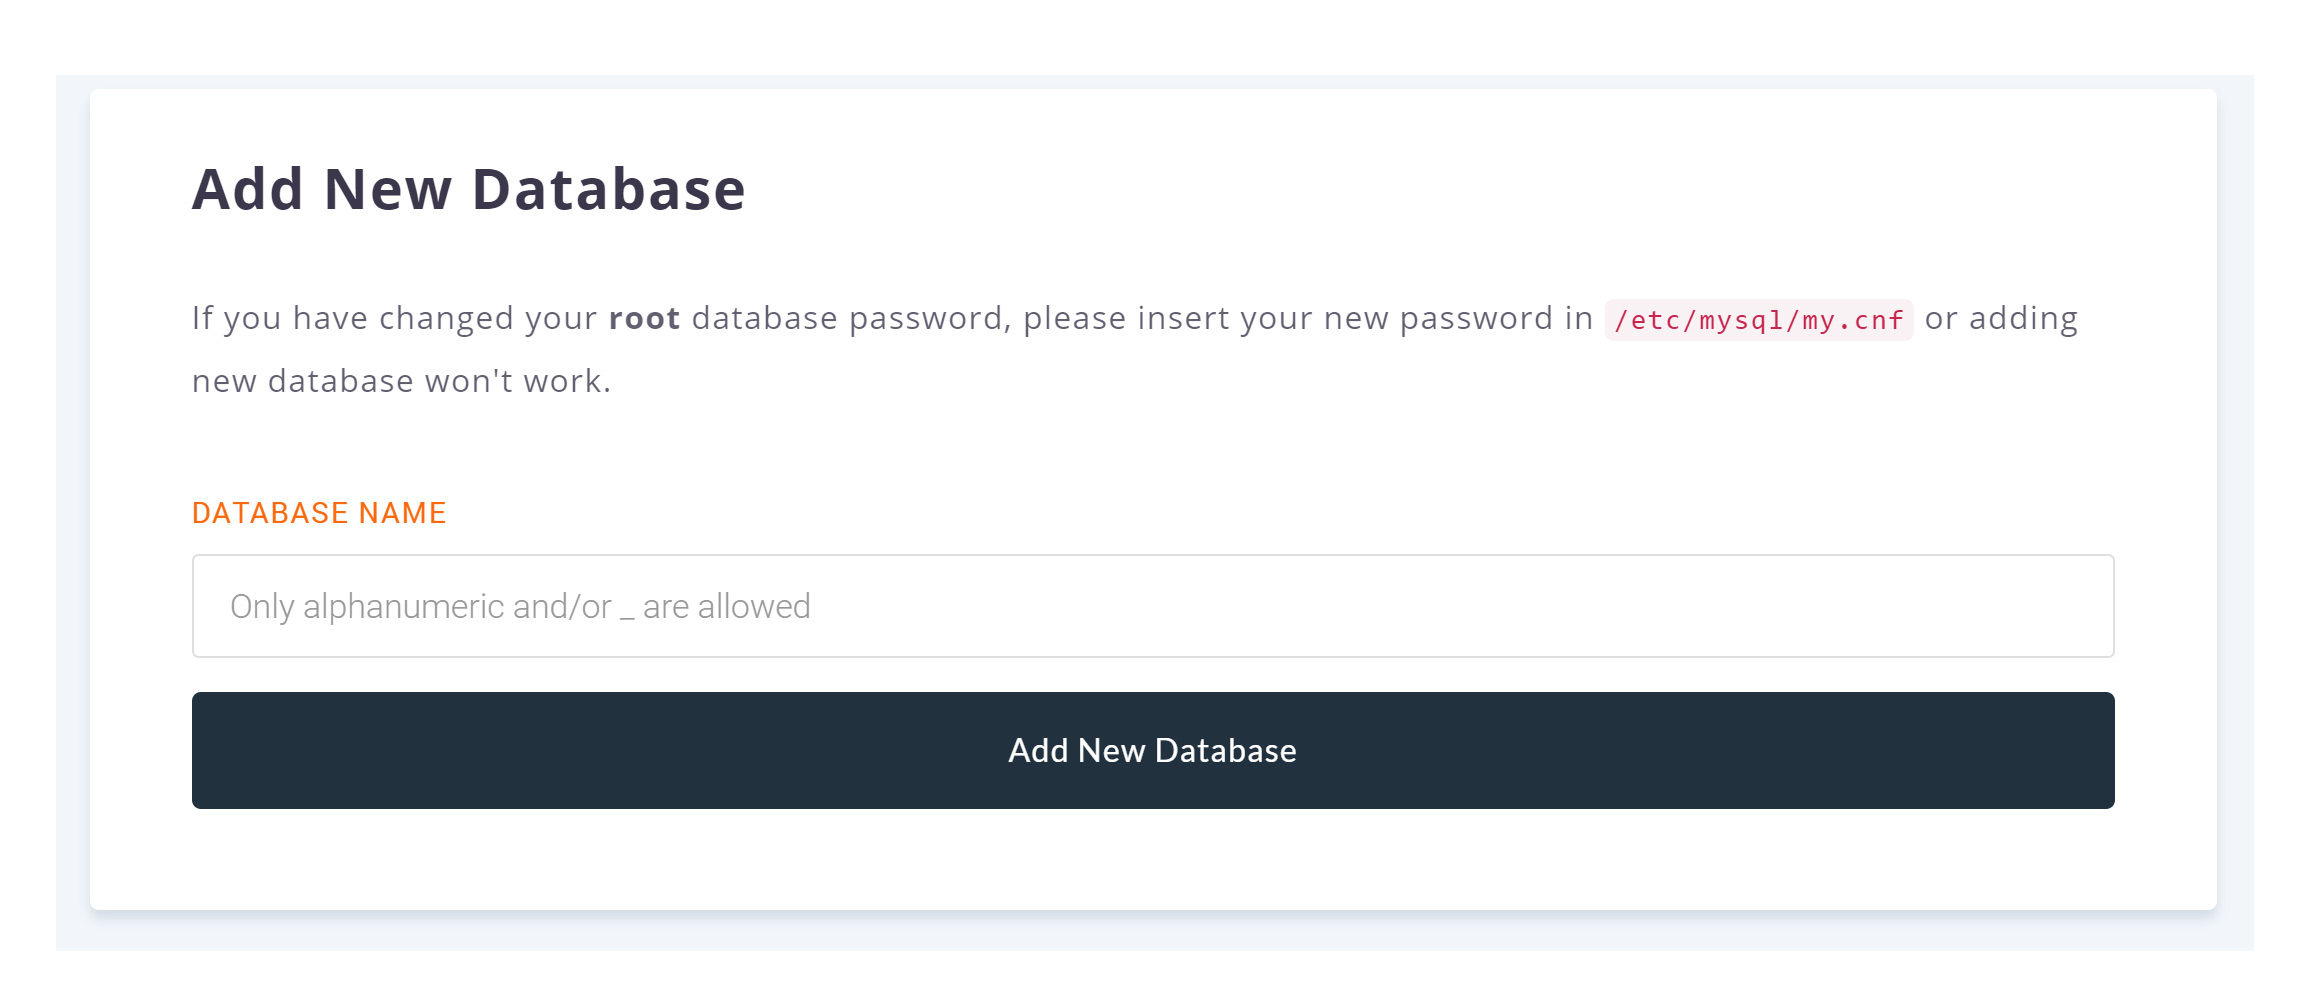
Then go ahead and create a new Database

You can create a database user in the same “Database” tab. Then link the Database User to the Database you have just created.

Make sure you save the database name, database user and database password! We need it later.

Install WordPress with Runcloud.io

Go to your application and pick “script installer” then go ahead and run it.

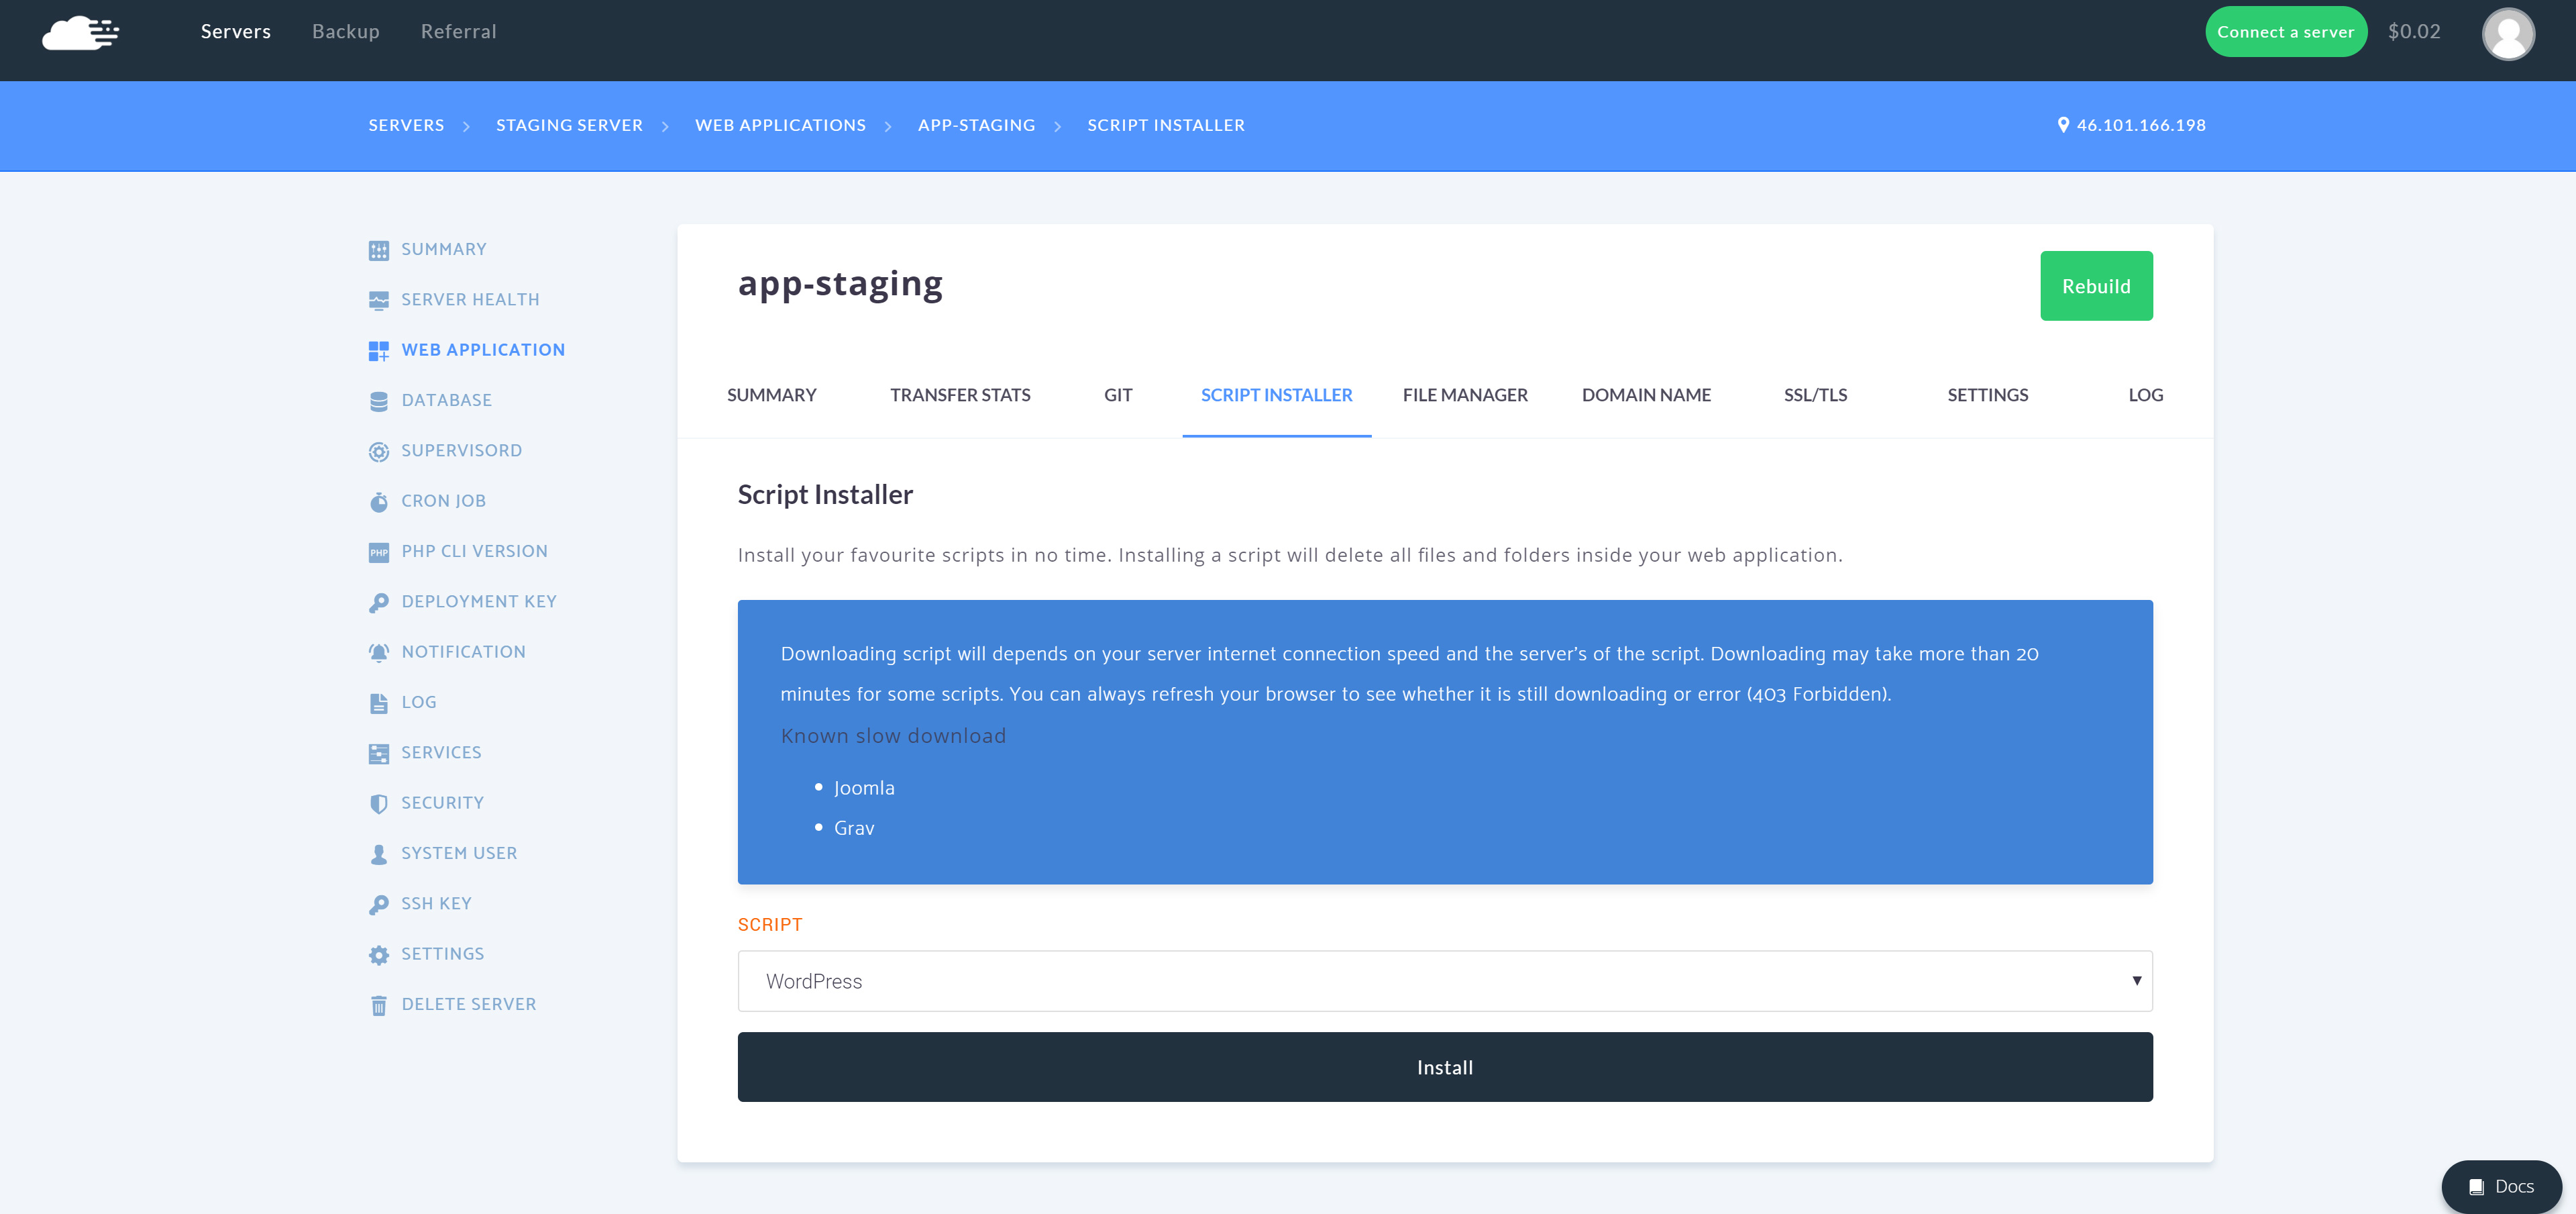
Now our application is ready! Now move your old site.

There are many different approaches you could take to migrating a site. I’ve been using the manual method explained below because that’s just the way I got used to doing it. If you don’t want to use SSH then you can use either: Wp-Duplicator or Migrate-DB-Pro.

For the purposes of this tutorial, I am going to assume you have the “wp-content” directory for the site you wish to migrate and an export file of the mySQL database (“database.sql”) saved on your local desktop (though the steps aren’t too much different even if you are ssh’d into a different remote server).

Move your files and database

First we’ll want to compress or copy the “wp-content” directory:

With SSH we can do the following:

tar -czf wp-content.tar.gz wp-content/
Now, transfer that to the remote directory where the new WordPress install is:

scp wp-content.tar.gz root@xxx.xxx.xx.xxx:/home/runcloud/webapps/app-oderbrunner/
(Depending on the size of the file, this might take quite a while to transfer.)
Now, switch back to the remote shell and make sure you’re in the files directory for the site (/home/runcloud/webapps/app-oderbrunner). We’re going to remove the current “wp-content” directory, unzip the new one we uploaded, and then remove that zip file:

rm -rf wp-content
gunzip -c wp-content.tar.gz | tar xopf –
rm wp-content.tar.gz

Without SSH (and a looong wait)

Login to your FTP and copy the wp-content files to your computer.

Then upload the wp-content files to the new site at /home/runcloud/webapps/app-oderbrunner/

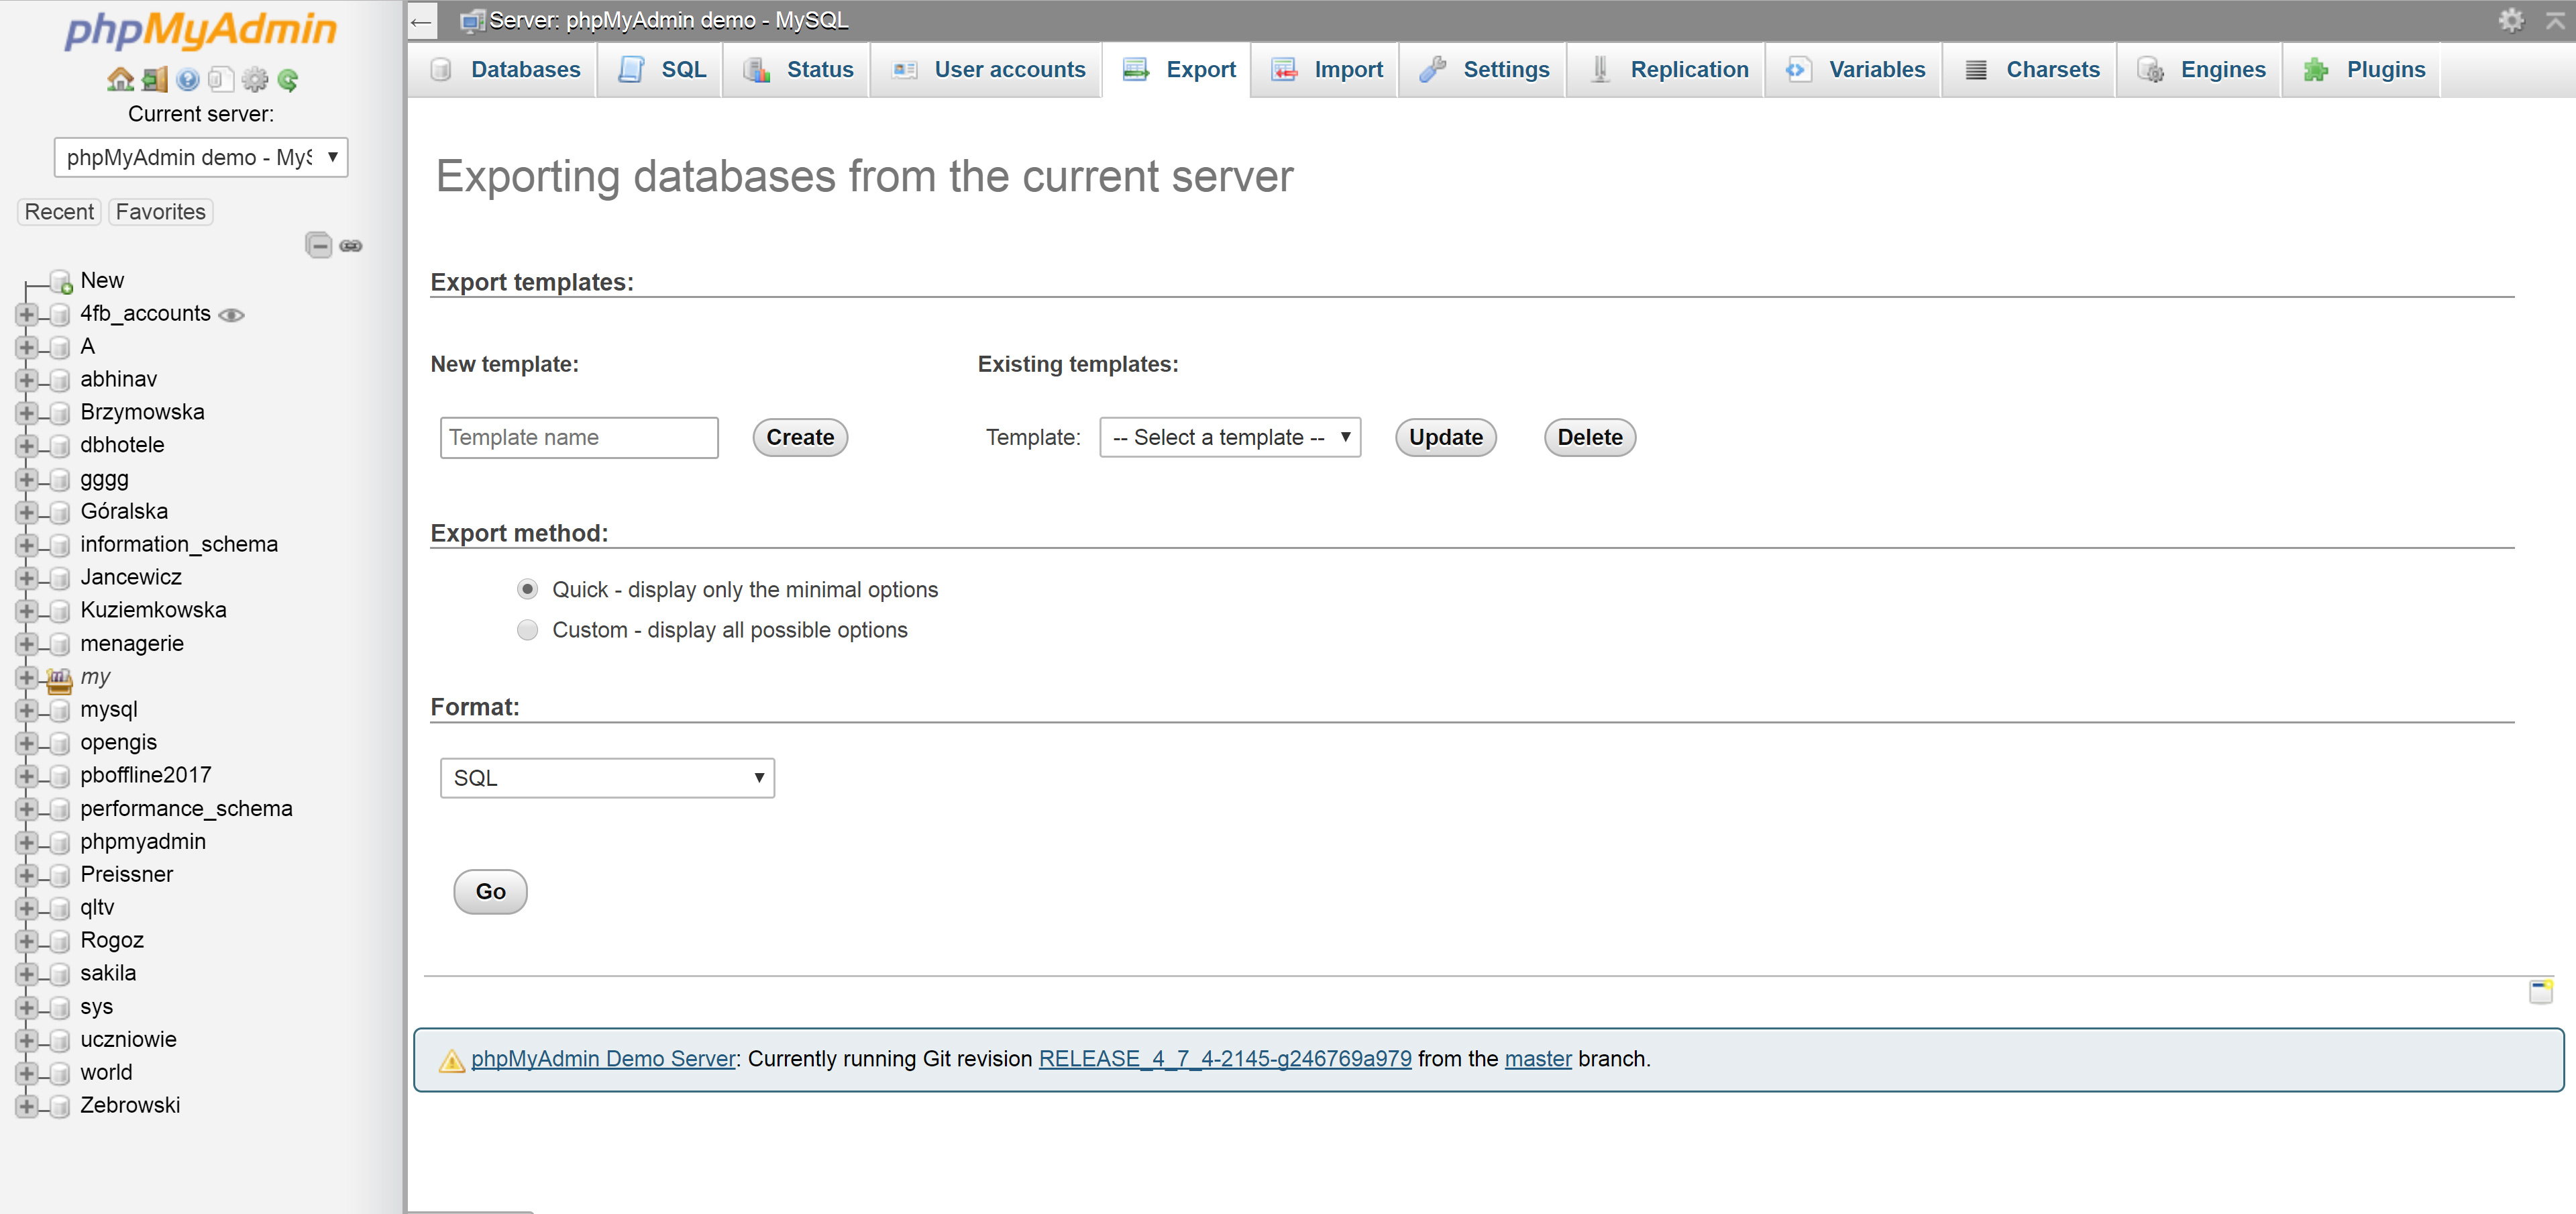
Next lets export the SQL database with Phpmyadmin

Go to Phpmyadmin website and download the files.

Upload Phpadmin to your old website: /htdocs/app-oldwebsite/Phpmyadmin-34tg3tgwg/

Edit Phpmyadmin file config.sample.inc.php

Add a long random text to blowfish_secret.


/**
 * This is needed for cookie based authentication to encrypt password in
 * cookie. Needs to be 32 chars long.
 */
$cfg['blowfish_secret'] = 'RANDOM TEXT GOES HERE FEWG#@TGWEV'; /* YOU MUST FILL IN THIS FOR COOKIE AUTH! */

Save as config.inc.php.

Visit yoursite.com/Phpmyadmin-34tg3tgwg/

Login with your database credentials.

Then export your database with Phpmyadmin. Super Easy!

Move SQL database

Install Phpmyadmin to /home/runcloud/webapps/app-oderbrunner/Phpmyadmin-34tg3tgwg/

Then use the option Import. Select your database and run! If the database is too big then you can zip it and upload it.

Install Search and Replace and change all your Urls

Last step is to replace the URLs in the database. Which is super easy.

Go download Database Search and Replace Script in PHP.

Unzip the file and add all the files to a folder on your new site:

Visit yourwebsite.com/Search-Replace-DB-master/

Fill in your database credentials that we noted down earlier. If you forgot them than go back to your runcloud.io dashboard and trace them.

Run the script. Done!

Lastly edit your wp-config.php file in the main WordPress folder with your database credentials.


&amp;lt;?php
define('DB_NAME', 'db_name_here');
define('DB_USER', 'db_user_here');
define('DB_PASSWORD', 'db_password_here');

define('DB_HOST', 'localhost');
define('DB_CHARSET', 'utf8');
define('DB_COLLATE', '');

Wrap Up

Hopefully this has been helpful. It was a lot of work but it’s worth it! Now you know how to everything manual and free (other than the VPS hosting by DO and VPS management panel from Runcloud) If you have any additional suggestions or tips, feel free to leave them in the comments.

Filed Under: WP Tutorials

How to add Total Price Calculation to your WooCommerce Product Page with AJAX

Posted on October 6, 2017 2 Comments

Total Price Calculation on WooCommerce Product page

Sometimes you want to show the total calculated price when your site visitor wants to add bulk products to his cart. You can easily do this by adding the following snippet to your website.

Filed Under: Wordpress, WP Tutorials

How to Install Roots Bedrock on a Digital Ocean Droplet running on Serverpilot via SSH

Posted on May 25, 2017 Leave a Comment

I assume in this post that you have already installed Serverpilot on your DigitalOcean Droplet, you have some basic Composer knowledge and that you are already connected to your server via SSH (using Putty for example).

Create an app in your Serverpilot Dashboard and install Bedrock

Start by creating a fresh app on your development server with your preffered username. Next SSH into your server and run the following command inside your app directory. I ran the following commands to get to my directory and downloaded Bedrock using the following commands:

cd /srv/users/**username**/apps/**appname**/
composer create-project roots/bedrock

Your directory should look likes this in order for the next command to work:

CHANGELOG.md   composer.lock  LICENSE.md  README.md  web
composer.json  config         public      vendor     wp-cli.yml

If your bedrock files are in a folder called bedrock. Then you can run the following command to move all the files to the /**appname**/ folder.

mv bedrock/* ./

Then run a syslink command to connect your (empty) public folder to the web folder of Bedrock.

ln -s /srv/users/**username**/apps/**appname**/web /srv/users/**username**/apps/**appname**/public

Congrats! Bedrock is now installed and now you just have to fill in your Database information in the .env file located in the main folder of your app.

Filed Under: WP Tutorials Tagged With: bedrock, development, roots.io, sage, serverpilot

Linux SSH Useful Server Commands to Remember: Grep, Permissions and more.

Posted on May 2, 2017 Leave a Comment

Finding files

During theme adjustments I often have to figure out where things are. I often use this to search for divs or content in Theme files on my server:

$ grep -rnw '/srv/users/developer/apps/appname/public' -e "genesis_header"

MySQL Database related

The commands for import and export of database.

// For export we use:
$ mysqldump -p -u user dbname > filename.sql

// For import we use:
$ mysql -p -u user dbname < filename.sql

// Keep your database password ready, you will need it.

More commands to follow, comment below if you want me to add any other ones.

Filed Under: Linux Tagged With: grep, mysql, mysqldump, server, ssh

How to Install Roots Sage 8.5.1 on a Digital Ocean Droplet running on Serverpilot via SSH

Posted on May 1, 2017 Leave a Comment

This week, I have been looking at Sage Roots 8.5.1 to install on my server. I would like to get into some more modern workflow and hopefully save some time in the long run while developing websites.

Sage has a big update coming and they plan on using Yarm, Boostrap 4 and more.

Therefore, the install is a litle bit different for the latest version of Sage. Don’t mix them up. I decided to go for the latest stable build but was pulling in the build from Github, obviously this won’t work as the stable build still uses Gulp and Bower. I have used these in the past and still remember it quite well so it wasn’t too hard to setup. Basically, I followed the Theme installation instructions here.

Connect to your Server and run the following command in your themes folder

Serverpilot Composer is a little bit different, so instead of “Composer” you have to use: “composer7.1-sp” as shown below.

# @ example.com/site/web/app/themes/
$ composer7.1-sp create-project roots/sage your-theme-name 8.5.1

Install NodeJS, NPM, Bower and SASS on Ubuntu

Next I installed all of the above using the following commands:

$ sudo apt-get update
$ sudo apt-get install nodejs

In this case, we also need to install npm, which is the Node.js package manager. You can do this by typing:

$ sudo apt-get install npm

Lastly, we still need Bower and SASS. We can use:

$ sudo bower install
$ sudo npm install node-sass

I got an error when I was trying to install SASS, if you do get an error then check if everything has been installed okay with:

$ nodejs --version
$ npm --version

If you see that everything is installed and well then you might have to create manually a symlink /usr/bin/node. Shortcut for bash compatible shells:

$ sudo ln -s `which nodejs` /usr/bin/node

Or if you use non-standard shells, just hardcode the path you find with which nodejs:

$ sudo ln -s /usr/bin/nodejs /usr/bin/node

Now you can run the commands to kickstart your Sage project, navigate to your theme directory and run these two commands:

$ npm install
$ bower install

For more info on which commands you can run just check out the Sage Tutorial for version 8.5.1.

Update 6/6/2017

Small Github Workflow

This is more of a reminder for myself so that I remember what to do next. I started to work with Github with an external development server. I decided not to use a local one because I’m always connected to the web and my backups always run in the cloud.

First off I authenticated my development server with Github using this guide.

Then I pushed my projects to Github using the following (also borrowed from github guide).

git init
# Add the files in your new local repository. This stages them for the first commit.

git add .
# Adds the files in the local repository and stages them for commit. To unstage a file, use 'git reset HEAD YOUR-FILE'.
Commit the files that you've staged in your local repository.

git commit -m "First commit"
# Commits the tracked changes and prepares them to be pushed to a remote repository. To remove this commit and modify the file, use 'git reset --soft HEAD~1' and commit and add the file again.
Copy remote repository URL fieldAt the top of your GitHub repository's Quick Setup page, click  to copy the remote repository URL.

In Terminal, add the URL for the remote repository where your local repository will be pushed.

git remote add origin remote repository URL
# Sets the new remote
git remote -v
# Verifies the new remote URL
Push the changes in your local repository to GitHub.

git push origin master
# Pushes the changes in your local repository up to the remote repository you specified as the origin

After this, everything was working for me! Now I’m off to install the setup with Bedrock, so more coming soon!

Filed Under: Wordpress, WP Tutorials Tagged With: digital ocean, install, roots.io, sage, serverpilot

How to fix WC-API and the PayPal Instant Payment Notification Error

Posted on March 24, 2017 Leave a Comment

This week I spent a couple of hours figuring out why I was receiving the following notifcation from PayPal via e-mail:

Please check your server that handles PayPal Instant Payment Notifications (IPN). IPNs sent to the following URL(s) are failing:

https://mywebsite.com/wc-api/WC_Gateway_PPEC/

If you do not recognize this URL, you may be using a service provider that is using IPN on your behalf. Please contact your service provider with the above information. If this problem continues, IPNs may be disabled for your account.

The solution was quite simple

Apparently, WooCommerce has a bug that allows you to set permalinks for products to: “/%product_cat%”. Basically, this breaks the WooCommerce API page in which it receives notifications from PayPal. It basically creates a 404 error, page not found. To fix it, is easy. Just include a bit of text before this tag: “products/%product_cat%”. Then the page will work again. You can also write some custom code to redirect WP to your product pages properly using the Rewrite API/add rewrite rule.

I did come across another suggestion.

You can check the Language Encoding for PayPal buttons (Profile and Settings > Selling Tools > PayPal button language encoding > More Options.

You then need to check the characters being sent to PayPal with yours and if it matches it should work.

Neither of these solutions work?

Make sure your running SSL 🙂

Find the error log to check what is going on

If this is not the problem then you can check your error log to see what is being communicated with PayPal. Usually you can find the error log:

  • in your server’s root folder, called error.log
  • in public_html or similar folder, called error.log
  • in var/logs or similar, called error.log
  • additionally, if you have debugging enabled in WordPress and you have it saved to a file, it will be in the wp-content folder, and called debug.log
  • If you are having trouble finding the file then insert the following code into your template somewhere: <?php phpinfo(); ?> and search the page for the error_log value.

Filed Under: WooCommerce, Wordpress

How to connect to Zalando API with PHP and WordPress

Posted on March 3, 2017 Leave a Comment

Here is a quick way to integrate Zalando API into your WordPress website.

Add Zalando PHP Wrapper from Github using Composer and BxSlider for Zalando Product Images

I used BXslider as a product image slider in this code and I added the ZalandoPHP wrapper from Github by Chris Schalenborgh with Composer. You can also manually add it to your project but I find that Composer is the way to go because it’s much easier to maintain your packages.

Use Ajax to fetch the product images

The product images in this code were only updated after each update of the window. I recommend you use AJAX to fix that problem.

I was about to add that but then we decided to stop using the Zalando integration in this project because of an alternative that fitted better with the business objective.

Hopefully this code is useful for someone out there! Have fun!

<?php /** * Created by Alexander on 9/15/2016. */ use ZalandoPHP\ZalandoPHP; use ZalandoPHP\Configuration\GenericConfiguration; use ZalandoPHP\Operations\Articles; // use ZalandoPHP\Operations\Filters; function atp_zalando_api_products($attr) { //$articles->setCategory('baby-accessoires,baby-accessoires-promo,babys-schoenen,babys-schoenen-promo,babyslaapzak,babyslaapzak-promo,babyslofjes,babyslofjes-promo,kinderkleding-baby-ondergoed-rompers,kinderkleding-baby-ondergoed-rompers-promo,luxe-baby-accessoires');
	//$articles->setCategory('babys-schoenen-promo');
	//$articles->setCategory('mens-lightweight-running-shoes-sale');
	// Develop Wrapper so that Price Range is included
	//$articles->setPrice(9-60);
	//$articles->setCategory('sportschuhe-herren-sale');
	//$articles->setColor('red,green');
	//$articles->setBrand('adidas');
	$conf = new GenericConfiguration();
	try {
		$conf
			->setLocale('de-de')
			->setClientName('zalando-php-wrapper')
			->setResponseType('array')
			->setTimeout(12)
			->setConnectionTimeout(45);
	} catch (\Exception $e) {
		echo $e->getMessage();
	}
	$zalandoPHP = new ZalandoPHP($conf);

	$shoes = new Articles();
		$shoes->setPage(1);
		$shoes->setPageSize(5);
		$shoes->setCategory('laufschuhe-herren');
	
	$shirts = new Articles();
		$shirts->setPage(1);
		$shirts->setPageSize(5);
		$shirts->setCategory('sports-herren-shirts');
		
	$shorts = new Articles();
		$shorts->setPage(2);
		$shorts->setPageSize(5);
		$shorts->setCategory('sporthosen-herren');
	
	extract( shortcode_atts( array(
        'type' => shoes //default price
    ), $attr ) );
	
		if($type === 'shoes') {
			$formattedResponse = $zalandoPHP->runOperation($shoes);
		}
		
		if($type === 'shirts') {
			$formattedResponse = $zalandoPHP->runOperation($shirts);
		}
		
		if($type === 'shorts') {
			$formattedResponse = $zalandoPHP->runOperation($shorts);
		}
		
			foreach($formattedResponse['content'] as $content => $products) {
//				echo '
<div class="row">
';		
					echo '
<div class="col-md-6">
';				
					
					// Loop throgh the product images
						echo '
<div class="col-md-4">
';
					// Change BX Slider so that it loads in Modal
							echo '
<ul class="bxslider col-md-4">';
					
							foreach ($products['media']['images'] as $product) {
									$image = $product['smallHdUrl'];
									echo '
<li><img src="'. $image .'"></li>

';
							}
						
							echo '</ul>

';
						echo '</div>

';
					
					// Loop through the product name
						echo '
<div class="col-md-8">
';		
							$name = $products['name'];
							echo '
<h4>' . $name .'</h4>

';

							// Loop through the product sale price and original price
							$i = 1;
							foreach ($products['units'] as $product) {	
							
							$salePrice = $product['price']['formatted'];
							$originalPrice = $product['originalPrice']['formatted'];
							
							if ( $originalPrice == $salePrice) {
									echo '<span style="color:green;font-size:20px;">' . $salePrice .'</span>';	
								 if($i == 1) break;
								}									
							else {
								echo '<span style="color:green;font-size:20px;">' . $salePrice .'</span>';
								echo '<span style="color:red;text-decoration: line-through;">' . $originalPrice .'</span>';
								if($i == 1) break;
								}
							
							}
					
					// Loop through the product sizes
							echo '<select name="type">';
								foreach ($products['units'] as $product) {
									$stock = $product['stock'];
									$size = $product['size'];
									echo '<option value="'. $size .'"'.(strcmp($option,$type)==0?' selected="selected"':'').'>Size: '. $size .'Stock:' . $stock .'</option>';
								}	
							echo '</select>';	
							echo '<a href="#" class="button btn">Add to Cart</a>';
						echo '</div>

';	
					echo '</div>

';	
//				echo '</div>

';
			}

//	echo '
<pre>';
//		print_r($formattedResponse[content][0][units][0]);
//		print_r($formattedResponse);
//		print_r($formattedResponse[content][0][units][0]);
//		print_r($formattedResponse[content][0][units][0][price][formatted]);
//		print_r($formattedResponse[content][0][media][images]);
//	echo '</pre>

';

}
add_shortcode( 'zalando', 'atp_zalando_api_products' );

Filed Under: API WP Tutorial, Wordpress, WP Tutorials

CMB2 Metabox Inline Multicheck Checkbox Tutorial

Posted on July 20, 2016 7 Comments

cmb2-webdev-studios

One of my latest repeated challenges was to add checkboxes again to the backend of WordPress. Having done it before, I knew what was expected but since it’s been awhile since I last coded metaboxes I had to look up some notes, blog posts and new software to use. I used to use Advanced Custom Fields, which is an amazing plugin. But, I think it’s an overkill for the functionality we need on this particular site. I needed something that would be able to load fast, has a small library and not too much UI. Also, I wanted to be able to inject it into WordPress as a dependency and not a plugin.

I found CMB2 for that, it had it all: calendar, text, email, checkbox, dropdown and more fields. So, I got to work. First by including it using composer and a “composer.json” file. I will discuss how that is done at a later period.

Generating a Multicheck Checkbox in the Admin of a Post Type

I started by using the following code in a dedicated php file to create my metaboxes. This one is for a hotelier to include the services they offer at each hotel. But it could really be anything (as always). You can just try it out and change the Metabox Title, post_type and ID to what you want. Here are some examples on GitHub to get your started: example-functions.php Or check out this Snippet Lirary.

add_action( 'cmb2_init', 'cmb2_add_metabox' );
function cmb2_add_metabox() {

	$prefix = '_cmb_';

	$cmb = new_cmb2_box( array(
		'id'           => $prefix . 'metabox',
		'title'        => __( 'Metabox Title', 'cmb2' ),
		'object_types' => array( 'post_type' ),
		'context'      => 'normal',
		'priority'     => 'high',
	) );

	$cmb->add_field( array(
		'id' => $prefix . 'hotel_amenities',
		'type' => 'multicheck_inline',
		'default' => '0',
		'options' => array(
			'Dry cleaning/laundry service ' => __( 'dry cleaning/laundry service ', 'cmb2' ),
			'24-hour front desk ' => __( '24-hour front desk ', 'cmb2' ),
			'Facilities for disabled guests' => __( 'facilities for disabled', 'cmb2' ),
			'airport_transportation' => __( 'airport transportation', 'cmb2' ),
		),
	) );

}

Generate the Checbox

To create the checkbox we just use $cmb->add_field and type out the type multicheck_inline with some options. That was really straightforward and easy. I could immediately understand why people like CMB2.

Here is an image with the result on the backend.
CMB2-Multicheck-Checbox-Tutorial-WordPress

Unserialize the Checkbox data

This is something I’m still experimenting with. If anyone can help me explain how unserialze works and how I can use it that would be awesome.

$custom_checkbox_group = unserialize($post_meta_data['_cmb_hotel_amenities'][0]);

echo $custom_checkbox_group['_cmb_hotel_amenities'][0];

Just a quick check on how Post Meta is being stored

Paste this code to test and seee on the front-end how the data is being stored into an array. I think unserialize has something to do with how our _cmb_hotel_amenities data is stored.

$test = get_post_meta( $post->ID, $custom_checkbox_group, true ) . '<br>';
echo '<pre>';
print_r($test);
echo '</pre>';

You can show it on the front-end like this and start playing around with the values

A foreach loop will go through each value and basically show it on the front-end.

<?php if ( $amenities = get_post_meta( get_the_ID(), '_cmb_hotel_amenities', true ) ) { 


?>
		<?php foreach ( $amenities as $amenity ) { ?>
			<?php echo $amenity; ?>
		<?php } ?>
<?php } ?>

You can add the following code (below) to add html to the data.

		
//remove spaces just in case
$meta = str_replace( '|', '<li>', $meta );
 
//split strings into array on commas
$meta = implode( '</li>', $meta );

echo $meta;
?>

Basically this goes through each item in the loop and shows each as a list item. Quite useful.

Another way to process the data on the front-end

In the end I went with the following way to show the data.

<h6 class="widget-title">Amenities</h6>
<ul>
<?php 
//get meta value as string
$meta = get_post_meta( get_the_ID(), '_cmb_hotel_amenities', true );
 
foreach ( $metas as $metas ) { 
	?>
	<li>
		<?php
			echo $metas; 
		?>
	<li>
	<?php
}		

Filed Under: WP Tutorials Tagged With: checkbox, cmb2, custom fields, foreach, get_post_meta, get_the_ID, implode, multicheck, str_replace, unserialize

H-FARM Accelerate #1: Welcome to H-FARM.

Posted on May 24, 2016 Leave a Comment

My startup was picked in the H-FARM Wellness Accelerator for Spring 2016. While my train started to accelerate, I left behind a city which hosted a number of important events in my life. In Milan, I enjoyed taking part in a path of education (graduated from The Hague’s Inholland University), romance, teaching, networking, web-design and personal transformation. In the last two years I have been able to focus on what defines me as a person, professional and human-being. It has taken a lot of books, events and conversations but I feel closer to my goals than ever (but yet they are so intangible and it always feels like I just got started somehow).

Some Context to help understand. H-FARM

I arrive with a smile at the (Venice) Mestre Trainstation and start looking for my ride. Unfortunately, the driver thought I would arrive at the Venice Airport. I stand there waiting comfortably because it doesn’t matter. I have arrived and an adventure is about to begin. I make a phone call and inquire where the driver is and before I knew it I arrived at Tenuta about 5KM from the H-Farm Campus, Tenuta was going to be my accommodation for some time. At the Wellness Accelerator, everything is taken care of, so you can focus on the most important thing… yourself and your work.

The next day I woke up earlier than usual and went outside to meet the other groups quite quickly. There was Andre (Fitsapp), Bernardo (Train Me), Laura (Fitssi) and Bernardo. We drove to the Campus and had our breakfast together (Cappucio + Brioche). Note: I’m going to buy some fruits and have a filling breakfast before I go to the Campus from now on.

After breakfast, I cleaned up my computer and cleared out my calendar. Did some reading, planning and decided on things to do during the accelerator. Then I had my meeting with Timothy, Alvaro and Jessica. We all answered three simple questions: Who, Why, How? It ended with a pitch of about 30 seconds. It went quite well as everyone was on the same page and everyone had a relevant background.

I moved to Italy to live a new life two years ago. I choose Italy because I wanted to try something new and I had already lived in Spain. I’ve got two degrees: one in audio engineering and media and entertainment management. I enjoy creating things and have always done so (websites, music, events). There is something fulfilling about looking back and seeing what you have made. I don’t watch TV shows, play games and use social media without a purpose. A friend once told me that you should always ask yourself the following at the end of your day: “What did I do to be healthy, productive, happy and what did I give today?”. It’s pretty good to live by that rule.

Ultimately, I’m here to concentrate and live monk-mode. My goal is to work on a beautiful success or failure. It doesn’t matter if we succeed or fail, the important thing is that we tried. In the next 14 days all of the start up teams will have adopted new beneficial habits, gained confidence and gained new perspectives because it only takes 14 days to completely change your habits.

At the H-FARM Campus

H-FARM Campus Birds Eye

The H-FARM Campus. A Startup heaven in Italy. Photo by H-FARM.

Alvaro and Jessica take care of the program and help us make connections with people we want to meet. Alvaro had a startup here in the incubator but started working here afterwards. Jessica started around May while she is finishing her university degree. Timothy has been in Italy for over 20 years and has created a number of businesses, one of which, is an award winning Wine E-commerce platform. If you ever get the chance to meet Timothy then you should ask him about this and he will give you a couple of funny comments.

After some small talk I had to pitch the project. Over the next few months we will continuously have to pitch our project. So far, not bad. My feedback for this pitch was to name the company at the beginning of the pitch and near the end. To include something about myself and to focus more on the “holistic” rather then an example of the services right away. In this way you make it easier for the VC to ask questions about the products your selling.

Our first workshop included an introduction on the program and we discussed what exactly it meant to be an entrepreneur an startup.

The Entrepreneur looks for Innovations, Opportunity and Real Value.

1. Innovators

“Entrepreneurs are innovators who use the process of shattering the status quo of existing products and services, to set up new products, new services” Joseph Schumpeter (1930s)

Joseph Schumpeter 1930

2. Opportunists

The entrepreneur exploits new market opportunities. My startup exploits the trend of the ever increasing number of quality fitness facilities in hotels.

3. Real Value

An entrepreneur uses innovations and opportunity to generate real value for a specific target audience. The entrepreneur asks oneself “What can I do for my client in order to create value?”. Remember, it’s not important to tell people what you are doing or how you are doing it. But, what’s important is to explain the problem of your target audience and how you intend to solve it. This might not give the tingles to everyone when they hear your pitch. But, that’s not important. What really matters is that there is someone out there. That someone will fall in love with your idea and will want to find out more.

The Paradoxes of being an entrepreneur

entrepreneur main characteristics important list

What are the main characteristics of a successful entrepreneur

Holistic and Focused: You should have a grand view on the opportunities. But at the same time be attentive to the details. Steve Jobs for example had an image to create a beautiful computer, but paid attention to the details such as the fonts displayed on the screen.

Ambition and Humility: Be humble and listen to criticism but at the same time be ambitious. We are going to create the best booking platform that people have ever seen.

Demanding and Generous: There is an old Chinese saying “Give before you take”.

Engaged and Curious: Be absolutely focused on what you are doing. Almost obsessed with everything possible. At the same time, be curious to other solutions. Sometimes, things may not be as you think and be ready to overhaul everything and make a change.

Humility is the most important because the problem needs to be clear. VCs are only interested in fixing problems and scaling quickly. If you can show that people love your product from the start and your making profits with low losses then you can tell VCs “Look, right now we are spending this and making this amount of profit. If you give me 5 million we will make this amount of profit”. In the USA, VCs want to go from 1 Million to 20 Million.

Next we discussed the “Business Model Canvas”. It reminded me a little bit of Micheal Porter’s Value Chain. This is something I am going to cover in my next post.

Filed Under: Accelerator Tagged With: accelerator, h-farm, incubator, wellness

Bulk Rename Multiple File Names Completely With A Bash Script in Linux

Posted on September 28, 2015 Leave a Comment

Recently, I had to bulk rename about 50 file names in bulk on Ubuntu 14.04 LTS (Linux) and I was having a difficult time in finding a proper way to do this without the need for additional software. I checked out “Renamer” which is a good option if you would like to keep strings of text inside the original file name or for the more complicated bulk renaming. But in the end I found a good Bash script to get the work done.

All it does is change all jpg files in the current directory into a numerical progression from 1 to x.

Here is the bash script to bulk rename multiple file names (use Terminal in Linux):

#!/bin/sh
num=1
for file in *.jpg; do
       mv "$file" "$(printf "%u" $num).jpg"
       let num=$num+1
done

You can even add more information to your file names by changing the line:

mv "$file" "$(printf "%u" $num).jpg"

Just replace “filename” into whatever you need:

mv "$file" "filename-$(printf "%u" $num).jpg"

Good luck!

Filed Under: Linux

  • 1
  • 2
  • 3
  • Next Page »

Recent Posts

  • Migrating a WordPress Website Manually with Phpmyadmin, Search and Replace, DigitalOcean and Runcloud
  • How to add Total Price Calculation to your WooCommerce Product Page with AJAX
  • How to Install Roots Bedrock on a Digital Ocean Droplet running on Serverpilot via SSH
  • Linux SSH Useful Server Commands to Remember: Grep, Permissions and more.
  • How to Install Roots Sage 8.5.1 on a Digital Ocean Droplet running on Serverpilot via SSH

Find more content

Affiliate links
  • cheap shared hosting
  • low priced virtual servers only 5$
Affiliates
  • If someone buys a product then I get a commission.
  • You pay the same price using my affiliate links.
  • I can spend more time making newsletters and tutorials.
  • Thanks for visiting!

Connect with me

Recent Comments

  • Pedro Gómez on Migrating a WordPress Website Manually with Phpmyadmin, Search and Replace, DigitalOcean and Runcloud
  • Tim Delmeire on How to add Total Price Calculation to your WooCommerce Product Page with AJAX
  • Jaehyuk J Yang on How to add Total Price Calculation to your WooCommerce Product Page with AJAX
  • Alexander de Jong on A guide on customising the membership experience with Theme my Login (TML)
  • Judit Sarkany on A guide on customising the membership experience with Theme my Login (TML)

Recent Posts

  • Migrating a WordPress Website Manually with Phpmyadmin, Search and Replace, DigitalOcean and Runcloud
  • How to add Total Price Calculation to your WooCommerce Product Page with AJAX
  • How to Install Roots Bedrock on a Digital Ocean Droplet running on Serverpilot via SSH
  • Linux SSH Useful Server Commands to Remember: Grep, Permissions and more.
  • How to Install Roots Sage 8.5.1 on a Digital Ocean Droplet running on Serverpilot via SSH

Copyright © 2014 | Alexander de Jong | About | Contact | Privacy | Sitemap