alexanderdejong.com

Wordpress Developer

  • Home
  • Blog
  • Projects
  • Contact
You are here: Home / Archives for Wordpress

How to Hide the WP Admin Bar

Posted on March 30, 2015 Leave a Comment

The WP Admin bar that WordPress automatically adds to your website when you are logged in can be seriously annoying (especially while you are designing away at your client’s website).

admin-bar

This bar can be frustrating because it can slightly throw off your design and you don’t really need it for anything. Here’s a snippet of code which will prevent that toolbar from displaying, just add it to your functions.php file or a plugin:

Hide the WP Admin Bar with the following php code

add_filter('show_admin_bar', '__return_false');

With this quick hack you don’t need change any CSS and your layout will look as it should. The filtering/hook system is really useful!

Filed Under: WP Tutorials Tagged With: wp admin bar

Will SSL make my Website slower?

Posted on March 30, 2015 Leave a Comment

Google is giving more weight to HTTPS but at the same time Google also wants to penalize for slower websites. And it seems that HTTPS takes longer to load than non-HTTPS.

“Moreover it takes more time to get a HTTPS webpage rendered on Browser when compared to a HTTP webpage. This is due to the required negotiation time of the server to authenticate the GET request.”

They even write that:

“There is absolutely no need to serve a HTTPS webpage, when there is no question of any privacy.”

So for non-memberships sites you wouldn’t need to serve HTTPS pages. It makes it really questionable what is the best thing to do. Joost de Valk did the transition awhile back. The document on WordPress has been written a while ago, however the push from Google is quite recent. There is a global need for better online security in particular with websites running on WordPress or Joomla.

Why use SSL?

Trust factor is a big part of using SSL on your website, when a visitor sees that you have taken the effort to get your organization verified or at least have a trusted “green padlock” in your url then things seem more legit. The painful thing is when you keep receiving the mixed content messages. So you have to be very thorough in making sure everything is being delivered securely.

There are many other factors at play in ranking. Page load time does impact the way you rank, but its not a main factor and certainly not the only one. Other things such as a good Schema.org markup can improve your ranking as well. Yoast has the following experience with SSL and SPDY:

So. HTTPS doesn’t have to be slower, there’s obviously a tiny bit of overhead but then things like SPDY are actually faster than “old” HTTP implementations.

If you need HTTPS on a part of your domain, doing it for the entire domain means you can cache resources much more easily, use a CDN better, etc. So… Just make the move.

Google’s SSL SPDY could be a solution

Well, you can only use Google’s SPDY if you have your own server. If you don’t you could use CloudFlare. They have been offering SPDY to customers with SSL since 2012. If you switch over full SSL be sure your cdn supports SPDY or else you will reduce the speed of your website. SSL will make your site slower unless EVERYTHING is loaded over SPDY. And it depends on how your SSL has been configured.

Should you make the switch?

Probably, just make sure your Google Ads keep working, your files are loading securely, you change your HTTP links into HTTPS etc etc.

Filed Under: WP SEO

How to style two different blog pages in the same WordPress site

Posted on March 30, 2015 Leave a Comment

It’s quite easy to build two different styled blog themes on your WordPress website. You could do this by leveraging the Multi-site functionality of WordPress. Another option is to add a CSS class to each blog post for each category or tag. If you think this will make things confusing for the admin user then create two Custom Post Types (CPT) with their own taxonomies. In this blog post we will go through the various options available and their benefits.

Create a category and style the class to your taste. Or add a custom style to the post.

This would probably be the easiest way to do this. Just open up your single.php file and find the following line of code:

<div id="content" role="main">

Change this line of code to the following:

<div id="content" role="main" <div id="post-<?php the_ID(); ?>" <?php post_class(); ?>>">

The following classes are added by default:

.post-id
.post
.attachment
.sticky
.hentry (hAtom microformat pages)
.category-ID
.category-name
.tag-name

The output would look like this:

<div id="post-4564" class="post post-1264 category-18 category-dancing logged-in">

Let’s say your category name is webdesign and you would like to change the color of your Blog Title. You can simply add the following css to your style.css file.

.category-webdesign .entry-title h1 {
color:#000;
}

This method allows you to experiment with different ideas. You can:

  • Style Posts Based on Authors
  • Style Posts Based on Popularity using Comment Count
  • Style Posts based on Custom Fields

This is the least intrusive and quickest fix to changing the design of your category post.
However, it only allows you to add custom CSS. To rearrange the template you would to go a completely different way.

Creating a Custom Post Type to style blog (posts)

From a purely administrative perspective, the main benefit to CPTs is that admins can see a separate section for each CPT and can create a blog post, they would go to their own panel, one for each CPT. You can label each CPT with the names of specific individuals. Using that and a plugin to control Account Capatability (like Capability Manager ) would help to differentiate the two separate blog approach. You can even create a separate homepage with different WP query filters to show different content. Then you just add Taxonomies and the site url goes yoursite/custom-post-type/taxonomy. But if you want the single posts in each category to have another design then you will have to add some custom body classes and a unique template. It will take a couple of hours to do at least.

Use a Multi-site installation to style two different blogs

Just add one in a separate directory and install it from there.


Update for other methods mentioned in this post planned for next week April 7th 2015.

Filed Under: WP Tutorials

Should you give your Admin password to a developer?

Posted on February 15, 2015 Leave a Comment

When you are hiring a developer to develop a (child) theme you may be asked for admin access to your WordPress website. A few options will come to mind, you can create a new account and give him login details or hand him access to your account, but what is really the best thing to do?

You could have him setup a new site for you

You might want to create a separate copy of your site. This way you can have your developer work on a non-live version of the site and it will not interrupt the user experience. In the WP community we actually call developers who work on live sites “coding cowboys”. It’s really not the best way to go!

You should have the developer work in their own digital environment

The best thing to do would be to have them develop on their own domain and when it’s ready then they can just send you a backup of the site or upload it live without much interference for the user!

If you do decide to give complete access then be VERY careful. If the theme + plugin developer is not qualified then you risk having all your work and content ruined. Any seasoned developer will always make a full backup of the site before changing any code!

A developer can also do most of the work offline, but I think its better to do it on a live server configuration because by using the same configuration you can be sure that everything will work very well!

Filed Under: WP Business Tagged With: coding, copying, development

Hiring a WordPress Designer sidekick or Project Manager

Posted on February 15, 2015 Leave a Comment

It is quite a challenge in (WordPress) consulting to balance your workload between 15+ clients. You could already have a freelance developer that helps daily but keeping on top of clients multitude of questions and emails but you may end up slacking. Don’t worry, there some options to improving your communication to client that won’t cost you an arm and a leg. Options range from technical (think ticketing system, quicker log-in to clients dashboards) or hiring a sidekick.

Work with an assistant or project manager

Sometimes the best way to find a worthy assistant can be by connecting to other WordPress or Web developers. By asking for a good assistant you won’t have to weed through thousands of applicants to your new job opening.

It also opens up another option, why not share the assistant and minimize the costs? Just make sure you setup an agreement with them that they cannot take your clients for X years.

There are a lot of people out there who are looking to get into WordPress, you could try your luck by finding someone in your local area. Sure, you always have the risk they could take your client, but honestly if your client leaves its because they’re not happy with you not because of the designer.

how to work with a freelancer designer

Multisite WordPress Install

You can leverage a multisite install to allow you to login quickly to customer websites. Even go out of your way to include a ticketing system via a custom post type that appears in your main website.

This will allow you to offer your clients everything from hosting, website building, maintenance and some other stuff. You can have everything under one roof in this way. Just make sure you leverage more than 1 vps if you plan to host a lot of clients under the same roof. Also, it may not be the best solution if you have clients who need complicate WP applications but perfectly fine if you have a few clients that are using their website as a basic business card.

Come up with a system

Start up an account on Trello or a list service might be the perfect way to manage your handful of clients. When a client request comes in, simply create a new card in Trello. The key is to get things out of your head as fast as possible and into a list or calendar. With Basecamp you can assign the task to someone and they can then see the task within their dashboard. Just make sure you don’t use Trello for non-techy clients, it can be really difficult to understand due to its flexibility.

ticketing system wordpress

One of the best things I ever did was to integrate a ticket system into my workflow, so that when a request comes in you can simply respond to them accordingly. You can then enter your work time in the ticket, meaning you don’t require a separate time tracking app. At the end of the month, you print out your reports and create your invoices. You could again integrate this system into your clients websites or use a third party plugin/website. So long as you focus on your strengths. It’s cheaper to pay someone 20 dollar for an hour of labor than you waste 4-5 hours of your time doing the same task.

Filed Under: WP Business Tagged With: assistant, designer, freelancer

A guide on customising the membership experience with Theme my Login (TML)

Posted on November 28, 2014 7 Comments

A client asked me recently to style the login/registration and create a simple membership site. Although I spent quite a few hours looking at potential plugins, I felt that a lot of them didn’t fit the bill. I just needed something quick and easy to style, which eventually let me to the Theme My Login WordPress plugin. With over 900.000 downloads, I figured it would be worth a shot.

However, the documentation wasn’t that great, there was a lot of information to find but it was scattered across forums, StackExchange and Jeff Farthing’s own website. Therefore, I decided to write a guide on how to tackle the registration and login pages with Theme my Login.

Picking the right settings

This is probably the most straightforward part, I will quickly mention which ones are relevant to this guide. I won’t be going into the User Moderation, Custom User Links, Custom E-mail, and AJAX modules (AJAX might be discontinued in future updates of Theme my Login anyway) for now.

Stylesheet

This setting is turned off, we will be writing our own CSS.

E-mail Login

I find it a good user experience to be able to use their email as login name.

Custom Redirection

This is a really nice feature if you have multiple account types. You can redirect members after login based on user role.

reCAPTCHA

Pick up your key at Google reCAPTCHA, will help to stop bots from signing up to your site.

Security

Disable your wp-login page and set the max logins to a reasonable amount to stop bots from crashing your site with brute force hacks. You can also make your site private here which is great if you plan to create a members-only website.

Customising the Theme my login template files

So head on to your plug-ins and browse to the Theme-my-Login folder in which you will see templates (wp-content/plugins/theme-my-login/templates). This is where you can pick up the templates that you want to customize. The first one we will customize is the “login”. Download the login-form.php. And open it with your favorite editor.

Login Template

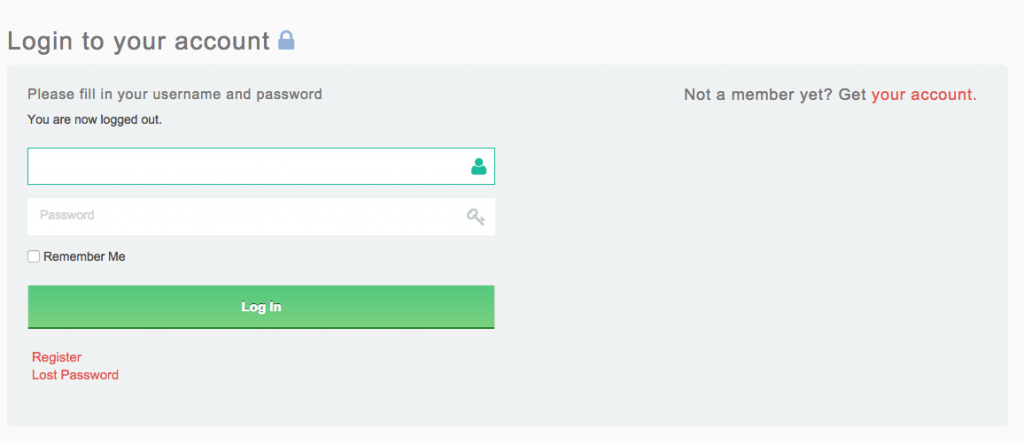
The original template is quite basic, has a few form fields and a login button. Here is what I did with it:

theme-my-login-example

The code is as follows
<?php
/*
If you would like to edit this file, copy it to your current theme's directory and edit it there.
Theme My Login will always look in your theme's directory first, before using this default template.
*/
?>
<h2>Login to your account <i class="fa fa-lock"></i></h2>
<div class="login-form" style="width:100%;" id="theme-my-login<?php $template->the_instance(); ?>">
<div class="three-sixths first">
<h6>Please fill in your username and password</h6>
	<?php $template->the_action_template_message( 'login' ); ?>
	<?php $template->the_errors(); ?>
	<form name="loginform" id="loginform<?php $template->the_instance(); ?>" action="<?php $template->the_action_url( 'login' ); ?>" method="post">
                <div class="form-group full-width">		
			<input type="text" class="form-control login-field" name="log" placeholder="Username or Email" id="user_login<?php $template->the_instance(); ?>" class="input " value="<?php $template->the_posted_value( 'log' ); ?>" size="20" />
		        <label class="login-field-icon fui-user" for="reg-name"></label>
		</div>
                <div class="form-group full-width">	
			<input type="password" class="form-control login-field" name="pwd" placeholder="Password" id="user_pass<?php $template->the_instance(); ?>" class="input" value="" size="20" />
			<label class="login-field-icon fui-password" for="reg-name"></label>
		</div>

		<?php do_action( 'login_form' ); ?>

		<p class="forgetmenot">
			<input name="rememberme" type="checkbox" id="rememberme<?php $template->the_instance(); ?>" value="forever" />
			<label for="rememberme<?php $template->the_instance(); ?>"><?php esc_attr_e( 'Remember Me' ); ?></label>
		</p>
		<p class="submit">
			<input type="submit" name="wp-submit" id="wp-submit<?php $template->the_instance(); ?>" value="<?php esc_attr_e( 'Log In' ); ?>" />
			<input type="hidden" name="redirect_to" value="<?php $template->the_redirect_url( 'login' ); ?>" />
			<input type="hidden" name="instance" value="<?php $template->the_instance(); ?>" />
			<input type="hidden" name="action" value="login" />
		</p>
	</form>
	<?php $template->the_action_links( array( 'login' => false ) ); ?>
</div>
<div class="two-sixths" style="float:right;">
<h5>Not a member yet? Get <a href="<?php echo get_site_url(); ?>/register/">your account.</a></h5>
</div>
</div>

And here is the CSS, btw I’m also using Twitter bootstrap responsive css which is awesome.

.login-form {
	background-color: #eff2f3;
	padding: 24px 23px 20px;
	position: relative;
	border-radius: 6px;
	float:left;
	width:100%;
}

.login-form .login-field-icon {
	color: #bfc9ca;
	font-size: 22px;
	position: absolute;
	right: 10px;
	top: 12px;
	-webkit-transition: 0.25s;
	transition: 0.25s;
}

.login-form .control-group {
	margin-bottom: 6px;
	position: relative;
}

.login-form .login-field {
	border-color: transparent;
	font-size: 17px;
	text-indent: 3px;
	position: relative;
	float: left;
}

.loginform .login-field:focus, .login-form .login-field:focus {
	border-color: #1abc9c;
}

.fui-user:before {
	-webkit-font-smoothing: antialiased;
	content: "\f007";
	font-family: 'fontawesome';
}

.fui-password:before {
	-webkit-font-smoothing: antialiased;
	content: "\f084";
	font-family: 'fontawesome';
} 

.login-form .login-field:focus + .login-field-icon {
	color: #1abc9c;
}

.login-form .login-field-icon {
	color: #bfc9ca;
	font-size: 22px;
	position: absolute;
	right: 10px;
	top: 12px;
	-webkit-transition: 0.25s;
	transition: 0.25s;
}

.full-width {
	width: 100%;
}

As for the CSS you probably get the idea. I’m adding icons to fields and placing the text inside the fields rather than outside. I’m also using “clear-search-form.js” to remove the placeholder text. It’s a small jQuery plugin, I will write a simple tutorial on how to use that later.

Register Template

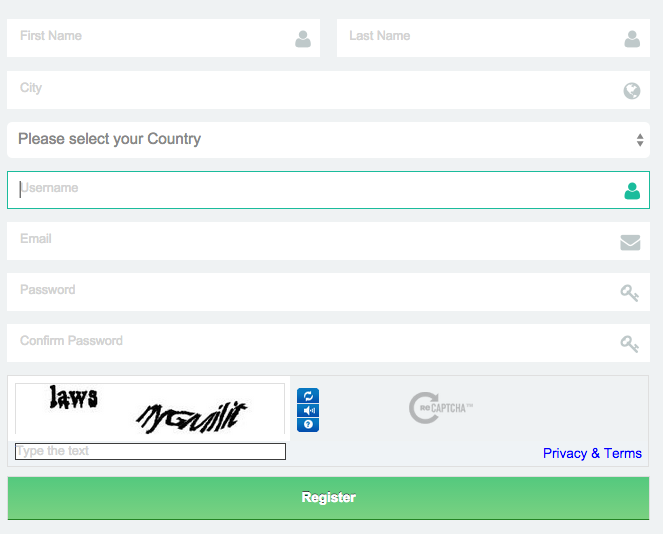
I extended the register template into the following:

theme-my-login-register-page-customise

The code is as follows

<?php
/*
If you would like to edit this file, copy it to your current theme's directory and edit it there.
Theme My Login will always look in your theme's directory first, before using this default template.
*/
?>
<h2>Create a free account <i class="fa fa-lock"></i></h2>
<div class="four-sixths first login-form" id="theme-my-login<?php $template->the_instance(); ?>">
<div class="one-half first"><h4>Community</h4><p>Inspiring fitness community, the number one stop to find healthy things to do.</p></div>
<div class="one-half"><h4>Membership</h4><p>Would you like to earn our special <a href="/membership-card/">Membership card?</a> Its simple, just get your health club involved in our network.</p>
</div>
	<?php $template->the_errors(); ?>
	<form name="registerform" id="registerform<?php $template->the_instance(); ?>" action="<?php $template->the_action_url( 'register' ); ?>" method="post">
                <div class="form-group one-half first">		
			<input type="text" name="first_name" placeholder="First Name" id="first_name<?php $template->the_instance(); ?>" class="form-control login-field" value="<?php $template->the_posted_value( 'first_name' ); ?>" size="20" tabindex="20" />
                    <label class="login-field-icon fui-user" for="first-name"></label>		
		</div>
                <div class="form-group one-half">		
			<input type="text" name="last_name" placeholder="Last Name" id="last_name<?php $template->the_instance(); ?>" class="form-control login-field" value="<?php $template->the_posted_value( 'last_name' ); ?>" size="20" tabindex="20" />
                    <label class="login-field-icon fui-user" for="last-name"></label>		
		</div>
                <div class="form-group full-width">		
			<input type="text" name="city" placeholder="City" id="city<?php $template->the_instance(); ?>" class="form-control login-field" value="<?php $template->the_posted_value( 'city' ); ?>" size="20" tabindex="20" />
                    <label class="login-field-icon fui-location" for="city"></label>		
		</div>

                <div class="form-group full-width">
			<select id="country" name="country" class="input">
		<option value="" disabled selected>Please select your Country</option>
		<option value="">Please select your Country</option>
		<option value="AF">Afghanistan</option>
		<option value="AX">Åland Islands</option>
		<option value="AL">Albania</option>
		<option value="DZ">Algeria</option>
		<option value="AS">American Samoa</option>
		
// etc. I wasn't able to get a complete list from WooCommerce via PHP so I had to work with my own list. Anyway it worked and when people select a field here its gets latched to their account so when they checkout the option is there.

			</select>
			</label>
		</div>

                <div class="form-group full-width">		
			<input type="text" name="user_login" placeholder="Username" id="user_login<?php $template->the_instance(); ?>" class="form-control login-field" value="<?php $template->the_posted_value( 'user_login' ); ?>" size="20" />
                    <label class="login-field-icon fui-user" for="reg-name"></label>
		</div>
                <div class="form-group full-width">
			<input type="text" name="user_email" placeholder="Email" id="user_email<?php $template->the_instance(); ?>" class="form-control login-field" value="<?php $template->the_posted_value( 'user_email' ); ?>" size="20" />		
                    <label class="login-field-icon fui-email" for="reg-email"></label>
		</div>

		<?php do_action( 'register_form' ); ?>
		<p id="reg_passmail<?php $template->the_instance(); ?>"><?php echo apply_filters( 'tml_register_passmail_template_message', __( 'A password will be e-mailed to you.' ) ); ?>
		<p class="submit">
			<input class="button btn-block" type="submit" name="wp-submit" value="<?php esc_attr_e( 'Register' ); ?>" />
			<input type="hidden" name="redirect_to" value="<?php $template->the_redirect_url( 'register' ); ?>" />
			<input type="hidden" name="instance" value="<?php $template->the_instance(); ?>" />
			<input type="hidden" name="action" value="register" />
		
</form>	
<hr>
<p><a href="#">Create a page</a> or do something else</p>
<?php $template->the_action_links( array( 'register' => false ) ); ?>
</div>

All these fields are customised with FontAwesome with an icon. (See the previous section on how to customise it with CSS. I’m a bit lazy to find and post up all the CSS code :). If you set up Google reCAPTCHA in the option settings of Theme-my-login. Then you will have a lovely reCAPTCHA at the bottom of the form stopping account spam.

As there are some new fields in the register page, I had to cook up some new validation and I wanted to connect the fields to data in WooCommerce. I did this by creating a “theme-my-login-custom.php” and placing it with the following contents in my main plugin folder located here “/wp-content/plugins”.

<?php 

function tml_registration_errors( $errors ) {
	if ( empty( $_POST['first_name'] ) )
		$errors->add( 'empty_first_name', '<strong>ERROR</strong>: Please enter your first name.' );
	if ( empty( $_POST['last_name'] ) )
		$errors->add( 'empty_last_name', '<strong>ERROR</strong>: Please enter your last name.' );
	if ( empty( $_POST['city'] ) )
		$errors->add( 'empty_city', '<strong>ERROR</strong>: Please enter your current city.' );
	if ( empty( $_POST['country'] ) )
		$errors->add( 'empty_country', '<strong>ERROR</strong>: Please enter your current country.' );
	return $errors;
}
add_filter( 'registration_errors', 'tml_registration_errors' );

function tml_user_register( $user_id ) {
	if ( !empty( $_POST['first_name'] ) )
		update_user_meta( $user_id, 'first_name', $_POST['first_name'] );
	if ( !empty( $_POST['last_name'] ) )
		update_user_meta( $user_id, 'last_name', $_POST['last_name'] );
	if ( !empty( $_POST['first_name'] ) )
		update_user_meta( $user_id, 'shipping_first_name', $_POST['first_name'] );
		update_user_meta( $user_id, 'billing_first_name', $_POST['first_name'] );
	if ( !empty( $_POST['last_name'] ) )
		update_user_meta( $user_id, 'shipping_last_name', $_POST['last_name'] );
		update_user_meta( $user_id, 'billing_last_name', $_POST['last_name'] );
	if ( !empty( $_POST['city'] ) )
		update_user_meta( $user_id, 'shipping_city', $_POST['city'] );
		update_user_meta( $user_id, 'billing_city', $_POST['city'] );
	if ( !empty( $_POST['country'] ) )
		update_user_meta( $user_id, 'shipping_country', $_POST['country'] );
		update_user_meta( $user_id, 'billing_country', $_POST['country'] );
	if ( !empty( $_POST['club_choice'] ) )
		update_user_meta( $user_id, 'club_choice', $_POST['club_choice'] );

}
add_action( 'user_register', 'tml_user_register' );

That concludes this guide for customising the login/register experience with Theme-my-login. I will add some information about how people can select their type of membership later if it gets requested in the comments. Good luck building and awesome register/login page!

Filed Under: Wordpress, WP Tutorials

How to code opening hours in WooCommerce Custom Fields Tutorial

Posted on September 25, 2014 6 Comments

What are Custom Fields?

Basically, fields is what makes WordPress into WordPress. The text area in your post/page editor, the checkboxes in the category field up to the buttons that allow you to publish a post. Imagine you are able to create this fields for yourself.

Being able to program custom fields for your WordPress site is an extremely useful ability that will immensely please your clients. With careful planning you can come up with custom fields that will save you (and your clients) heaps of time.

Powerful examples of using custom fields

Imagine you want to create an opening hours area on a directory website. You could write all the opening hours in the product pages. But this would mean you have to copy the mark up every single time and search for time table manually to change the hours. Not efficient at all.

I would suggest you read up a bit about (WooCommerce) custom fields on this very popular post Mastering WooCommerce Products Custom Fields – Remi Corson. This will bring you up to speed on how to program all the different fields. I will just be looking at Text fields in this Tutorial, so you know exactly how to make a quality opening hours section in your current/next WordPress site.

Let’s assign the tab in the back-end of WooCommerce

We want to add a nice tab in the backend in WooCommerce for easy access for the client and to keep our products organized. You can even add a conditional statement if you don’t want this to appear on certain products, but for now this will appear on all your products.

Basically we add the new tab to the woocommerce_product_write_panel_tabs function which is already defined by WooCommerce.


/** Custom Tabs for Opening Hours. **/

function opening_hours_options_tab() {
?>
	<li class="opening_hours"><a href="#opening_hours_data"><?php _e('Opening Hours', 'woothemes'); ?></a></li>
<?php
}
add_action('woocommerce_product_write_panel_tabs', 'opening_hours_options_tab'); 

/**
 * Custom Tab Options
 * 
 * Provides the input fields and add/remove buttons for custom tabs on the single product page.
 */
function opening_hours_options() {
	global $post;
	
	$opening_hours_options = array(
		'title' => get_post_meta($post->ID, 'opening_hours_title', true),
		'content' => get_post_meta($post->ID, 'opening_hours_content', true),
	);	
?>
	<div id="opening_hours_data" class="panel woocommerce_options_panel">
		<div class="club-opening-hours">
			<p class="form-field">
				<?php 
// Opening Hours Custom field Type
?>
<p class="form-field day_field_type">
	<label for="day_field_type"><?php echo __( 'Opening Hours', 'woocommerce' ); ?></label>
	<span class="wrap">
		<?php $day_field_type = get_post_meta( $post->ID, '_day_field_type', true ); ?>	
		<input placeholder="<?php _e( 'Monday', 'woocommerce' ); ?>" type="text" name="_day_field_one" value="<?php echo $day_field_type[0]; ?>" step="any" style="width: 250px;" />
		<input placeholder="<?php _e( 'Tuesday', 'woocommerce' ); ?>" type="text" name="_day_field_two" value="<?php echo $day_field_type[1]; ?>" step="any" style="width: 250px;" />
		<input placeholder="<?php _e( 'Wednesday', 'woocommerce' ); ?>" type="text" name="_day_field_three" value="<?php echo $day_field_type[2]; ?>" step="any" style="width: 250px;" />
		<input placeholder="<?php _e( 'Thursday', 'woocommerce' ); ?>" type="text" name="_day_field_four" value="<?php echo $day_field_type[3]; ?>" step="any" style="width: 250px;" />
		<input placeholder="<?php _e( 'Friday', 'woocommerce' ); ?>" type="text" name="_day_field_five" value="<?php echo $day_field_type[4]; ?>" step="any" style="width: 250px;" />
		<input placeholder="<?php _e( 'Saturday', 'woocommerce' ); ?>" type="text" name="_day_field_six" value="<?php echo $day_field_type[5]; ?>" step="any"  style="width: 250px;" />
		<input placeholder="<?php _e( 'Sunday', 'woocommerce' ); ?>" type="text" name="_day_field_seven" value="<?php echo $day_field_type[6]; ?>" step="any" style="width: 250px;" />
	</span>
	<span class="description"><?php _e( 'e.g. 06:00-22:00', 'woocommerce' ); ?></span>	
			</p>
		</div>
	</div>
<?php
}
add_action('woocommerce_product_write_panels', 'opening_hours_options');
As always save the fields in your database or you won’t be able to use them
// Save Fields
	add_action( 'woocommerce_process_product_meta', 'woo_add_custom_general_fields_save' );

	// Function to save all custom field information from products
function woo_add_custom_general_fields_save( $post_id ){
	
	// Opening Hours Custom Fields
		$day_field_type =  array( esc_attr( $_POST['_day_field_one'] ), esc_attr( $_POST['_day_field_two'] ), esc_attr( $_POST['_day_field_three'] ),esc_attr( $_POST['_day_field_four'] ), esc_attr( $_POST['_day_field_five'] ), esc_attr( $_POST['_day_field_six'] ), esc_attr( $_POST['_day_field_seven'] ) );
	update_post_meta( $post_id, '_day_field_type', $day_field_type );
		
}
Now how to display our opening hours using short code

You could add the tabs using a conditional statement in your project but lets keep it to short code so you can pretty much add it anywhere you like.

This function basically passes through each value added in the custom fields and adds the day of the week using a counter. So when it finds a custom field active it will print the date next to that field on the front-end. Shout out to Ivo for helping me figure out how to use the counter properly.

If there isn’t a value it will just skip the field completely.

add_shortcode('opening_hours', 'opening_hours_custom_fields');
// Add WooCommerce opening hours
//add_filter( 'woocommerce_after_single_product_summary', 'opening_hours_custom_fields',5 );
function opening_hours_custom_fields() {
    if ( $lista = genesis_get_custom_field( '_day_field_type', $post->ID ) ) {	
        $values = array();
	    $counter = 0;
		$days=array("Monday","Tuesday","Wednesday","Thursday","Friday","Saturday","Sunday");
        foreach ( $lista as $value ) {
            if ( $value != '' )
                $values[] = $value;
        }
        if ( $values ) {		 
            echo '<div id="hours_custom_fields">';
            echo '<ul>';		 
		foreach ( $values as $value ){
            echo "<li><div class='one-half first'>$days[$counter]</div><div class='right-hours one-half' style='text-align:right;'><i class='fa fa-clock-o'></i> $value </div></li>";
            $counter++;
        }
        echo '</ul>';
        echo '</div>';
	
		}			
    	}
}	

That concludes this post, now you have learned how to create a new tab in WooCommerce, save fields into the backend and add a counter to your code. Feel free to mangle the code as you like. Obviously you can change this example to more than just opening hours.

Feel free to link me to your articles or your projects. Would love to see your work in progress.

Filed Under: WP Tutorials

How to add jQuery Lightbox in WordPress

Posted on September 19, 2014 Leave a Comment

What is a jQuery lightbox?

While creating forms for a website I felt that a form was taking up a lot of room. Therefore, I decided to look for a plugin to create a pop up. A lightbox jQuery plugin allows you to create a clickable link with a pop up. There are a lot of plugins out there that do similar things but I didn’t want to install a WordPress plugin with a lot of extra features I don’t need.

WordPress built-in jQuery?

You may not have to look further than WordPress itself, there is a handy plugin already defined in WordPress called Thickbox. I will show you how to use both Thickbox and Colorbox in this post. Colorbox is a bit more feature rich, while Thickbox is in my opinion easier to implement.

How to add a lightbox to WordPress using Colorbox or Thickbox

Let’s start with loading Thickbox

As Thickbox is not loaded automatically, you have to start it in order to use it. Just paste the following in your functions.php file to start it up.

function aj_jquery_thickbox() {
add_thickbox();
}

add_action('wp_enqueue_scripts', 'aj_jquery_thickbox');

Now lets create the content

Here is an example of what we are trying to achieve:

Try out the thickbox and click here!

Surprise, here is the hidden content!

Don’t worry, its quite simple to achieve. The Thickbox codex page explains extra features that you may wish to include.

Here is the exact code to start up your own lightbox.

<div id="aj-content" style="display:none;">
     <p>
          Surprise, here is the hidden content!
     </p>
</div>

<a href="#TB_inline?width=600&height=550&inlineId=aj-content" class="thickbox">Try out the thickbox and click here!</a>

How to add in Colorbox JS instead?

As mentioned the second option is to add Colorbox.js. Place the JS and CSS file in your current theme’s folder and add the following code to functions.php.

add_action('wp_enqueue_scripts', 'aj_colorboxjs_scripts'); // initiate the function  

function aj_colorboxjs_scripts() {
wp_register_script ( 'colorbox-min' , get_stylesheet_directory_uri() . '/js/jquery.colorbox-min.js', array( 'jquery' ), '1', true );
wp_enqueue_script( 'colorbox-min' );

// Commented out because you probably want to use the minified version of the script
//wp_register_script ( 'colorbox' , get_stylesheet_directory_uri() . '/js/jquery.colorbox.js', array( 'jquery' ), '1', true );
//wp_enqueue_script( 'colorbox' );

wp_register_style ('colorboxcss', get_stylesheet_directory_uri() . '/css/colorbox.css','', '1', 'all');
wp_enqueue_style( 'colorbox' );
}

Now add the script that will target the CSS and start up the Colorbox plugin. This can also be pasted into your functions.php.

// Add the script to your footer
add_action( 'genesis_after','ajtheme_colorboxjs' );

//Colorbox - a pretty lightbox for content
function ajtheme_colorboxjs() {
	?><script type="text/javascript">
var $s = jQuery.noConflict(); $s(document).ready(function(){
$s(".inline-form").colorbox({inline:true, width:"50%", escKey:true, onOpen: function() {
                $s('#cboxOverlay').height($s(document).height());
        }, overlayClose:true, onLoad: function() {
    $s('#cboxClose').remove();
}});
$s(".callbacks").colorbox({
				onOpen:function(){ alert('onOpen: colorbox is about to open'); },
				onLoad:function(){ alert('onLoad: colorbox has started to load the targeted content'); },
				onComplete:function(){ alert('onComplete: colorbox has displayed the loaded content'); },
				onCleanup:function(){ alert('onCleanup: colorbox has begun the close process'); },
				onClosed:function(){ alert('onClosed: colorbox has completely closed'); }
				});
				//Example of preserving a JavaScript event for inline calls.
				$s("#cboxOverlay").click(function(){
				closeColorBox();
				});
				});
		</script><?php
}
Now add the following html in your theme (page, template or anywhere else)

With the following html we launch the lightbox in our theme. Notice that the above script targets the CSS ‘inline-form’ in our html below. Pretty easy and creative solution right?

<a class="inline-form" href="#inline_content"><p class="button">Launch Colorbox</p></a>

<div style="display:none">
<div id="inline_content" style="background:#fff;">
<p>This is the content that you will see in the lightbox</p>
</div>
</div>

Hope this helps you in your next WordPress project, as always feel free to leave a comment, I might be able to help.

Filed Under: WP Tutorials

Developing a Listing Website

Posted on August 29, 2014 Leave a Comment

Develop a listing website with WordPress can become a complicated matter, there is a lot of functional elements involved. However, I strongly believe that it’s the ultimate solution as WordPress sites do very well in Search Engines.

I’ve been developing the site intensively for the last few weeks and have come across quite a few challenges. I will blog about the challenges in the next few weeks and keep a list of links to each blog post in here for reference.

Here are a few topics I will be writing posts about (if I have enough time):

  • How to call reviews from Google Places with a details request and parsing the returned JSON.
  • Placing custom fields inside of WooCommerce.
  • How to add Google maps to product listings in PHP.
  • Connect your search field to Google Places API.

Well thats it for now, will check in later this week to write some more.

Filed Under: Wordpress

  • « Previous Page
  • 1
  • 2

Recent Posts

  • Migrating a WordPress Website Manually with Phpmyadmin, Search and Replace, DigitalOcean and Runcloud
  • How to add Total Price Calculation to your WooCommerce Product Page with AJAX
  • How to Install Roots Bedrock on a Digital Ocean Droplet running on Serverpilot via SSH
  • Linux SSH Useful Server Commands to Remember: Grep, Permissions and more.
  • How to Install Roots Sage 8.5.1 on a Digital Ocean Droplet running on Serverpilot via SSH

Find more content

Affiliate links
  • cheap shared hosting
  • low priced virtual servers only 5$
Affiliates
  • If someone buys a product then I get a commission.
  • You pay the same price using my affiliate links.
  • I can spend more time making newsletters and tutorials.
  • Thanks for visiting!

Connect with me

Recent Comments

  • Pedro Gómez on Migrating a WordPress Website Manually with Phpmyadmin, Search and Replace, DigitalOcean and Runcloud
  • Tim Delmeire on How to add Total Price Calculation to your WooCommerce Product Page with AJAX
  • Jaehyuk J Yang on How to add Total Price Calculation to your WooCommerce Product Page with AJAX
  • Alexander de Jong on A guide on customising the membership experience with Theme my Login (TML)
  • Judit Sarkany on A guide on customising the membership experience with Theme my Login (TML)

Recent Posts

  • Migrating a WordPress Website Manually with Phpmyadmin, Search and Replace, DigitalOcean and Runcloud
  • How to add Total Price Calculation to your WooCommerce Product Page with AJAX
  • How to Install Roots Bedrock on a Digital Ocean Droplet running on Serverpilot via SSH
  • Linux SSH Useful Server Commands to Remember: Grep, Permissions and more.
  • How to Install Roots Sage 8.5.1 on a Digital Ocean Droplet running on Serverpilot via SSH

Copyright © 2014 | Alexander de Jong | About | Contact | Privacy | Sitemap